Ovation Celebrity CC28 for Repair
5 posters
Page 2 of 3
Page 2 of 3 •  1, 2, 3
 Worse than Poo on a Diaper!
I've started to remove the old epoxy from both the bridge and the sound board. . .
AR-R-G-G-G-H_H!
(Tension reliever. Had to be done) *ahem*
The bridge wasn't too difficult because there was, strangely, so little glue on it to begin with.
But the sound board was a whole 'nuther thing:
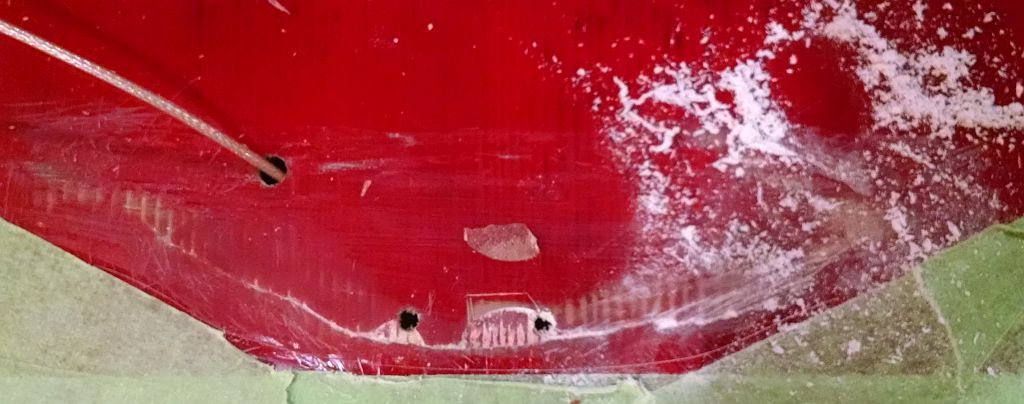
There is a miserably hard edge of glue, like a dam, along the back edge, which is what my knife was originally hitting in my earliest attempts at bridge removal.
While scraping, the blade caught a ragged edge and chipped out a piece of the original finish. That's it sitting above the anchor holes.
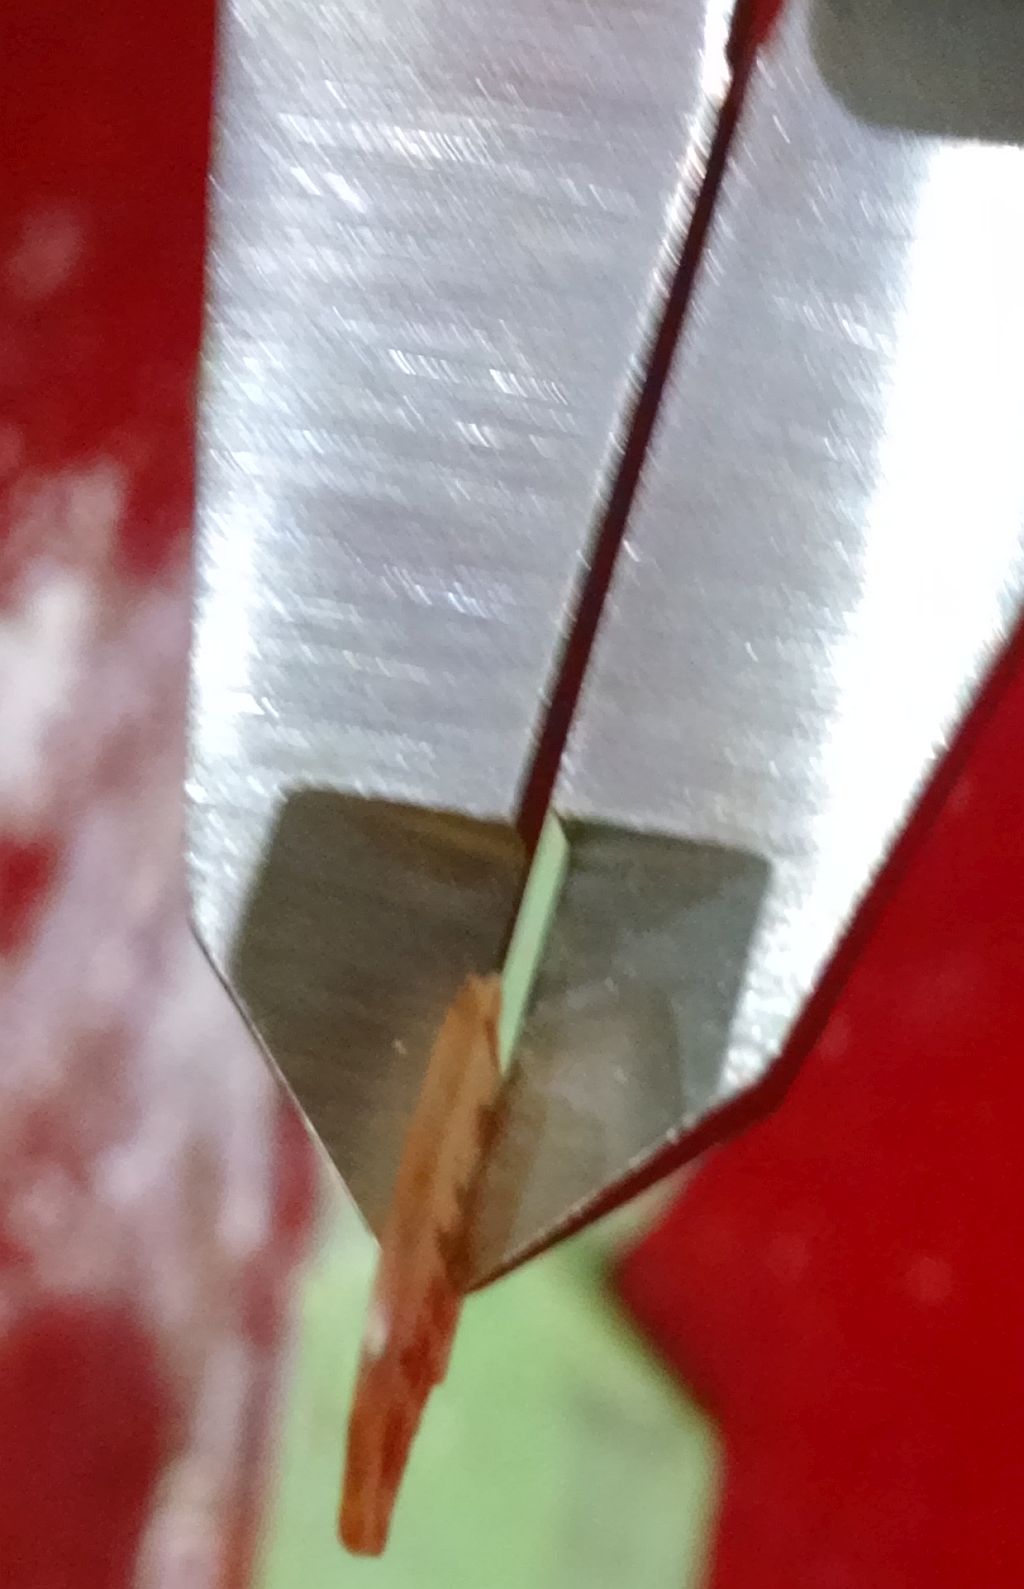
And man, is it THICK!!
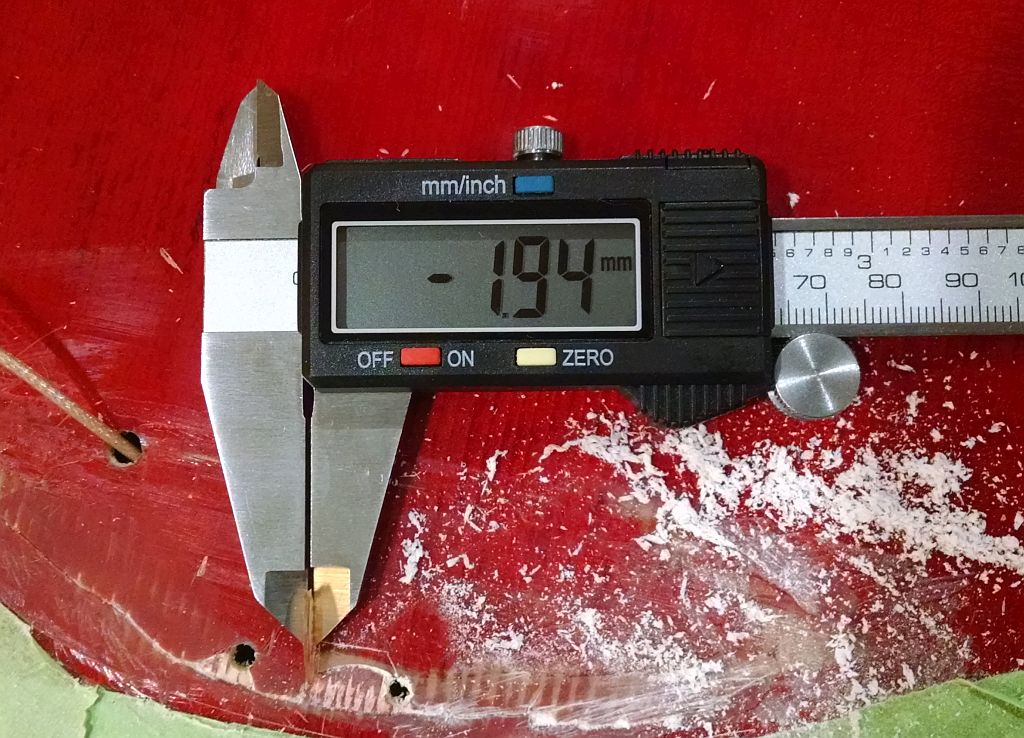
I always knew Ovation tops were ridiculously thick but geez loueeze . . .
After a hour or so of scraping with a blade, followed by coarse sandpaper here's where I'm at:

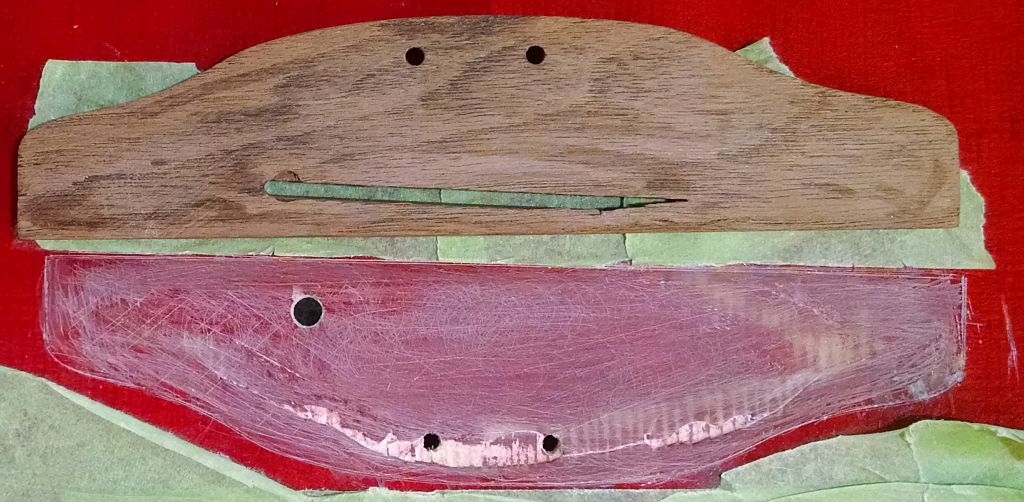
The glue remnant is pretty leveled but trying to make a dent in that finish?! It's about enough to bring this grown man to tears!
Titebond?
I was starting to think that removing the finish to bare wood and doing a proper Titebond connection was ultimately the best way to go.
That would also give me a long open time in order to set the clamping properly (remember the back is round and the guitar can roll around).
But honestly, facing this finish is a nightmare!
To remove it means I'll need to invest in a set of small chisels which I don't really want to do. Even then, the process of removing it is tedious and time consuming as hell. And I run the risk of chip out, outside the bridge area.
Epoxy?
This was my original plan, and of course the way Ovation, um, glues its bridges, sort of.
The reason the bridge failed was that it wasn't done properly in the first place.
Interestingly, the epoxy stuck just fine to the finish. It was the bridge surface which pulled away. That indicates to me that the wood was not prepped correctly, or at all. The glue residue was just a light smear.
I think I'm going to go with my original plan.
My main concern is that I only have at best, 6 minutes of open time to work with. If something goes wrong there's no going back and I'm well and truly buggered! *sigh*
AR-R-G-G-G-H_H!
(Tension reliever. Had to be done) *ahem*
The bridge wasn't too difficult because there was, strangely, so little glue on it to begin with.
But the sound board was a whole 'nuther thing:

There is a miserably hard edge of glue, like a dam, along the back edge, which is what my knife was originally hitting in my earliest attempts at bridge removal.
While scraping, the blade caught a ragged edge and chipped out a piece of the original finish. That's it sitting above the anchor holes.
And man, is it THICK!!

I always knew Ovation tops were ridiculously thick but geez loueeze . . .

After a hour or so of scraping with a blade, followed by coarse sandpaper here's where I'm at:


The glue remnant is pretty leveled but trying to make a dent in that finish?! It's about enough to bring this grown man to tears!
next step? Dunno.
Titebond?
I was starting to think that removing the finish to bare wood and doing a proper Titebond connection was ultimately the best way to go.
That would also give me a long open time in order to set the clamping properly (remember the back is round and the guitar can roll around).
But honestly, facing this finish is a nightmare!
To remove it means I'll need to invest in a set of small chisels which I don't really want to do. Even then, the process of removing it is tedious and time consuming as hell. And I run the risk of chip out, outside the bridge area.
Epoxy?
This was my original plan, and of course the way Ovation, um, glues its bridges, sort of.
The reason the bridge failed was that it wasn't done properly in the first place.
Interestingly, the epoxy stuck just fine to the finish. It was the bridge surface which pulled away. That indicates to me that the wood was not prepped correctly, or at all. The glue residue was just a light smear.
I think I'm going to go with my original plan.
My main concern is that I only have at best, 6 minutes of open time to work with. If something goes wrong there's no going back and I'm well and truly buggered! *sigh*

 Re: Ovation Celebrity CC28 for Repair
Was thinking you remove the rest of the saddle bit from the bridge.
 Re: Ovation Celebrity CC28 for Repair
You've come this far, it would seem a shame not to do belt and braces on this thing, eh?!
Not sure chisels would be the way forward; perhaps a rasp?
Not sure chisels would be the way forward; perhaps a rasp?

corsair- Senior Member
- Number of posts : 6329
Age : 65
Location : Mount Hunter, NSW, Australia
Registration date : 2008-04-08
 Re: Ovation Celebrity CC28 for Repair
Not exactly sure if that pickup will work properly directly on the sound board.
Every one I've ever seen or worked with are in the bridge(as that was) not on the sound board. I've no idea.
Pity to glue it and find it doesn't work????
Could always route out the bridge bottom and set another piece in?
Every one I've ever seen or worked with are in the bridge(as that was) not on the sound board. I've no idea.
Pity to glue it and find it doesn't work????
Could always route out the bridge bottom and set another piece in?
 Re: Ovation Celebrity CC28 for Repair
Rethinking using bolts on this.corsair wrote:You've come this far, it would seem a shame not to do belt and braces on this thing, eh?!
Not sure chisels would be the way forward; perhaps a rasp?
The holes will be helpful in re-positioning the bridge, but doing a bit more research, a couple of Luthiers blame the bolts for causing that awful hump.
Instead of the bridge failing and simply pulling away. the bolts actually hold on and pull the soundboard up and deform it. I think they're right.
A rasp would certainly help tear into that finish. Not sure how to use one in there though unless there's a small one with an offset handle. Not the most precise tool to use to stay inside the lines eh? Kinda like using a paint roller on a colouring book.
_________________
"A little song. A little dance. A little seltzer down your pants." -Chuckles the Clown

GUITARS : https://legend.barryeames.com
MUSIC/PIX/VIDEOS: https://getback.barryeames.com (including Spectrum ST)
 Re: Ovation Celebrity CC28 for Repair
First off, I don't own a router or a Dremel.Westbone wrote:Not exactly sure if that pickup will work properly directly on the sound board.
Every one I've ever seen or worked with are in the bridge(as that was) not on the sound board. I've no idea.
Pity to glue it and find it doesn't work????
Could always route out the bridge bottom and set another piece in?

But I have been thinking about gluing in a piece to create a new "floor". It won't be pretty but I'll do what I can to re-establish some sonic integrity.
I left a small remnant of what was there still attached to the slot area to remind me of the thickness. It was very, very thin!
Not really convinced it did a whole hell of a lot originally.
But I'll have a look about for a suitable piece of hardwood. I think all my scraps are softer types.
_________________
"A little song. A little dance. A little seltzer down your pants." -Chuckles the Clown

GUITARS : https://legend.barryeames.com
MUSIC/PIX/VIDEOS: https://getback.barryeames.com (including Spectrum ST)

corsair- Senior Member
- Number of posts : 6329
Age : 65
Location : Mount Hunter, NSW, Australia
Registration date : 2008-04-08
 Re: Ovation Celebrity CC28 for Repair
Bet you wish you never bought this 'thing'.
Seems more of a problem than it's worth and after all this it'll more than likely go belly up.
Seems more of a problem than it's worth and after all this it'll more than likely go belly up.
 Re: Ovation Celebrity CC28 for Repair
Again, it was bought as a project to muck about with and learn some new skills, and as an intellectual and physical challenge.Westbone wrote:Bet you wish you never bought this 'thing'.
Seems more of a problem than it's worth and after all this it'll more than likely go belly up.
This will never be a serious player but the goal is to make it playable.
Neither am I going to buy a lot of specialized tools. That's just not on, unless I see a use for them beyond this project.
Coincidentally, I have another acoustic guitar (not an Ovation) whose bridge is showing signs of lifting. What I learn from this experience will also help with that repair later on.
Hey, if I can deal with a rolly polly round back a normal flat back will be a breeze!
As for going "belly up" again, I am seriously toying with a modified (home made) Bridge Doctor/sound post type of solution which should stop it from ever happening.
I have a plan...

_________________
"A little song. A little dance. A little seltzer down your pants." -Chuckles the Clown

GUITARS : https://legend.barryeames.com
MUSIC/PIX/VIDEOS: https://getback.barryeames.com (including Spectrum ST)
 Re: Ovation Celebrity CC28 for Repair
SIX minute open (work) time? I suppose you're referring to epoxy rated at 10-15 minutes "working time" before it starts to gel?
For getting into the finish, you could modify an offset-style artist's palette knife (ridged) by gluing a shaped bit of Perma-Grit Flexible Strip to the face. I used a similar shaped tool by Sandvik to get thru the finish of my old cheapo acoustic that had the same issue.
For getting into the finish, you could modify an offset-style artist's palette knife (ridged) by gluing a shaped bit of Perma-Grit Flexible Strip to the face. I used a similar shaped tool by Sandvik to get thru the finish of my old cheapo acoustic that had the same issue.

ExFender- Financial supporter
- Number of posts : 212
Age : 78
Location : Germany
Registration date : 2019-10-30
 Re: Ovation Celebrity CC28 for Repair
6 minute J B Kwik Weld LINKExFender wrote:SIX minute open (work) time? I suppose you're referring to epoxy rated at 10-15 minutes "working time" before it starts to gel?
Thanks for the idea.For getting into the finish, you could modify an offset-style artist's palette knife (ridged) by gluing a shaped bit of Perma-Grit Flexible Strip to the face. I used a similar shaped tool by Sandvik to get thru the finish of my old cheapo acoustic that had the same issue.
I've been slowly grinding down the old epoxy glue by hand with pieces of coarse sandpaper wrapped around a small rectangular block. it's tedious and messy but it's working. The finish is another issue, hard as nails and very brittle.
_________________
"A little song. A little dance. A little seltzer down your pants." -Chuckles the Clown

GUITARS : https://legend.barryeames.com
MUSIC/PIX/VIDEOS: https://getback.barryeames.com (including Spectrum ST)
 A plan takes place
It's been a little while since I've updated this project.
Not for lack of interest, but more for want of a clear direction to go in!
These guitars do not have a bridge plate which would have gone a long way to keeping the bridge down in the first place. So, putting one in would be the logical thing to do. BUT the soundboard bracing is installed in a fan pattern, all pieces of which converge (you guessed it) under the bridge!
Installing a plate would mean cutting 2 or possibly 4 of the braces further weakening the top!
They work in part by pushing a dowel against the end plate behind the bottom strap button which in turn pulls the bridge down. Great idea.
Um...but this is an Ovation. There is no end plate because there are no sides or a flat bottom.
The body is a one piece round back shell which meets the soundboard all around. SO another approach is needed.
Here's my first attempt at a design:

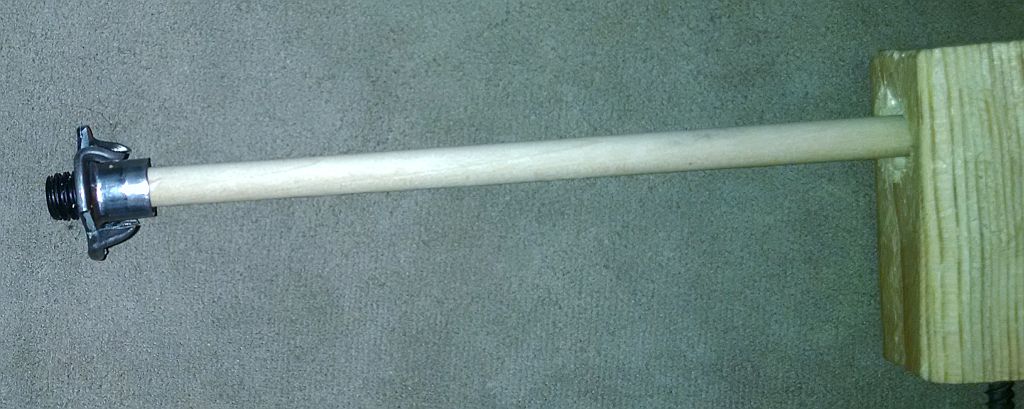
A rectangular block of Spruce is drilled to accommodate 5/16" dia. maple dowel.
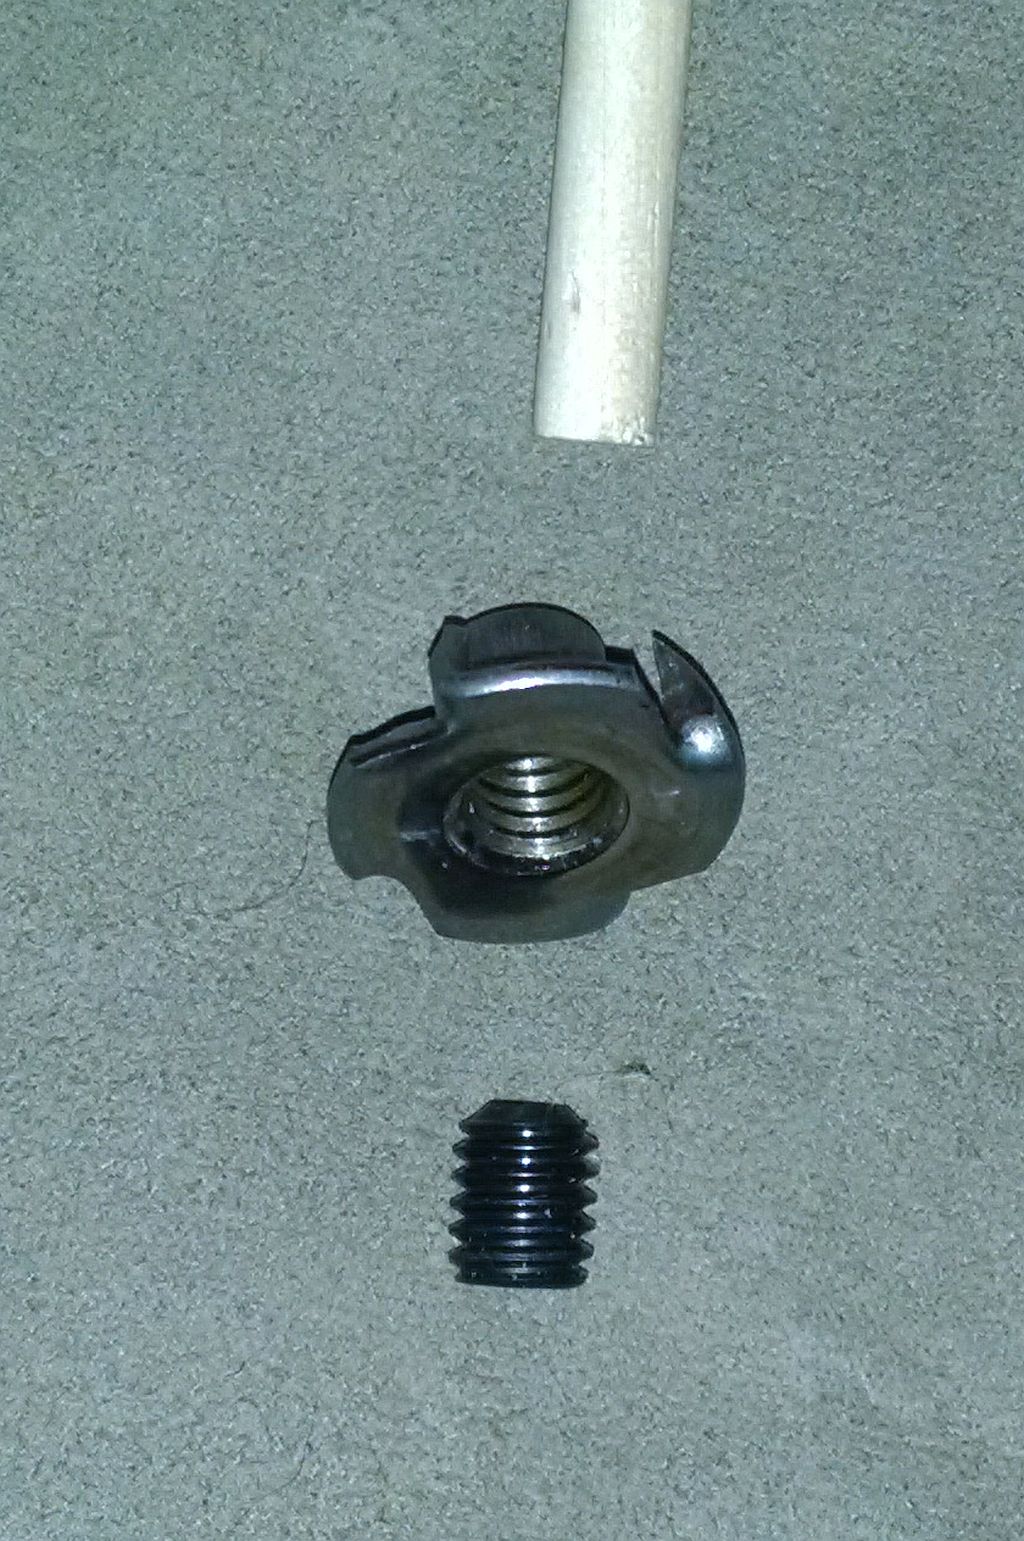
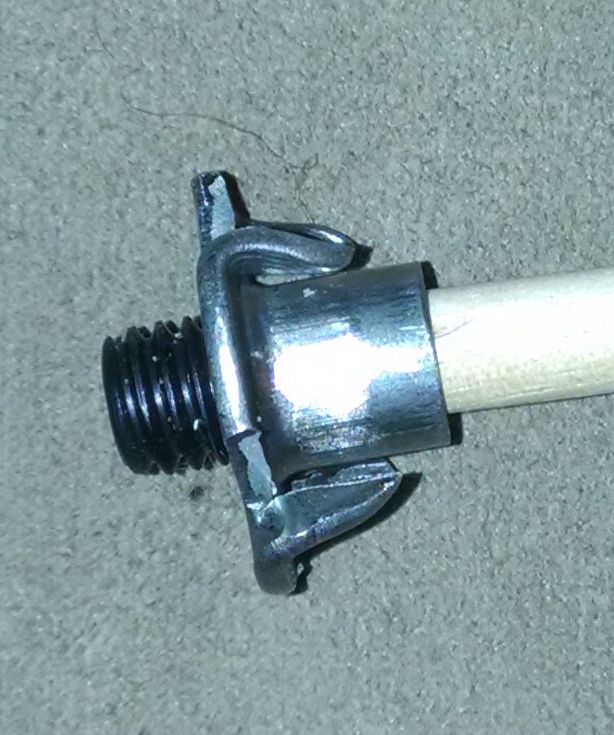
A 5/8" Tee nut is installed on the sound-hole side into which a matching socket set screw is inserted.
At the moment the other end of the dowel has a 1" (25mm) Styrofoam ball on it. Not sure if that will be on the final construction, I'm looking for a comparably sized wooden knob to replace it.
The bridge is screwed to the block via one of the now enlarged existing holes that was originally used to bolt it down to the top:
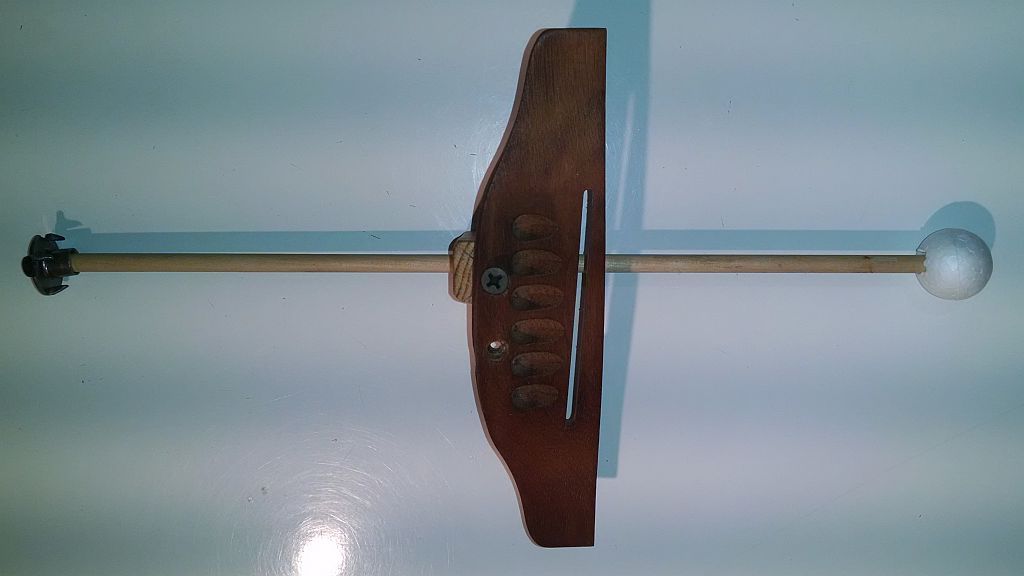

Once the block is screwed to the bridge, the dowel is inserted and pushed to the bottom of the guitar. A mark is made and the dowel is cut to that length less a third the depth of the block. The set screw is turned inside the tee nut which applies pressure to the dowel and stabilizes the bridge.
Instead I'm scoring it. I'm betting that the epoxy will stick just fine to it and the wood once everything is good and roughed up. What you see here is a light scuffing, but I'll soon go medieval on it!
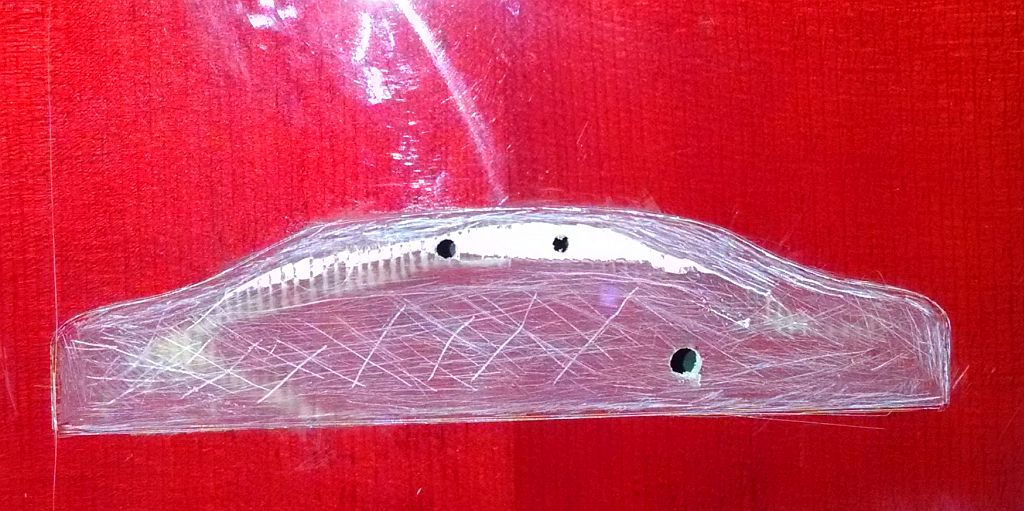
This finish is not only thick but very brittle. As I was cutting in the bridge outline I heard a quiet *snap*. The finish cracked in a straight line as you can pick up in this picture:

Damn! One more issue to address.
But not now.
And I ain't losing sleep over it.
Not for lack of interest, but more for want of a clear direction to go in!
The Problem
As mentioned a few times, Ovations are not your typical guitar construction so whatever one normally would do is usually not helpful. The main issue has been what to do to strengthen the bridge so the bugger won't lift up again.These guitars do not have a bridge plate which would have gone a long way to keeping the bridge down in the first place. So, putting one in would be the logical thing to do. BUT the soundboard bracing is installed in a fan pattern, all pieces of which converge (you guessed it) under the bridge!
Installing a plate would mean cutting 2 or possibly 4 of the braces further weakening the top!
The Solution(?)
I have been toying with the idea of a "Bridge Doctor" which would pull the top down and counteract the string pull. I installed one in my Vantage acoustic 12-string and it does a great job. Expensive as hell for what it is but a great fix.They work in part by pushing a dowel against the end plate behind the bottom strap button which in turn pulls the bridge down. Great idea.
Um...but this is an Ovation. There is no end plate because there are no sides or a flat bottom.
The body is a one piece round back shell which meets the soundboard all around. SO another approach is needed.
Here's my first attempt at a design:

A rectangular block of Spruce is drilled to accommodate 5/16" dia. maple dowel.
A 5/8" Tee nut is installed on the sound-hole side into which a matching socket set screw is inserted.
At the moment the other end of the dowel has a 1" (25mm) Styrofoam ball on it. Not sure if that will be on the final construction, I'm looking for a comparably sized wooden knob to replace it.
The bridge is screwed to the block via one of the now enlarged existing holes that was originally used to bolt it down to the top:


Once the block is screwed to the bridge, the dowel is inserted and pushed to the bottom of the guitar. A mark is made and the dowel is cut to that length less a third the depth of the block. The set screw is turned inside the tee nut which applies pressure to the dowel and stabilizes the bridge.


That F$%^*#g Finish!
I've managed to pretty well level out that ridge of glue build up at the back of the bridge area but it's been tedious, and I'm still pecking away at it. I've decided not to even try to remove the finish entirely. I think that's something that can only end in tears. (see last picture)Instead I'm scoring it. I'm betting that the epoxy will stick just fine to it and the wood once everything is good and roughed up. What you see here is a light scuffing, but I'll soon go medieval on it!

This finish is not only thick but very brittle. As I was cutting in the bridge outline I heard a quiet *snap*. The finish cracked in a straight line as you can pick up in this picture:

Damn! One more issue to address.
But not now.
And I ain't losing sleep over it.
_________________
"A little song. A little dance. A little seltzer down your pants." -Chuckles the Clown

GUITARS : https://legend.barryeames.com
MUSIC/PIX/VIDEOS: https://getback.barryeames.com (including Spectrum ST)
 Dry Fit of Bridge Doctor
I did a bit of cutting, carving, sanding, fiddling, and general swearing but in the end my home made bridge doctor appears all good and should do the job!
From the outside not much different except for the screw head:
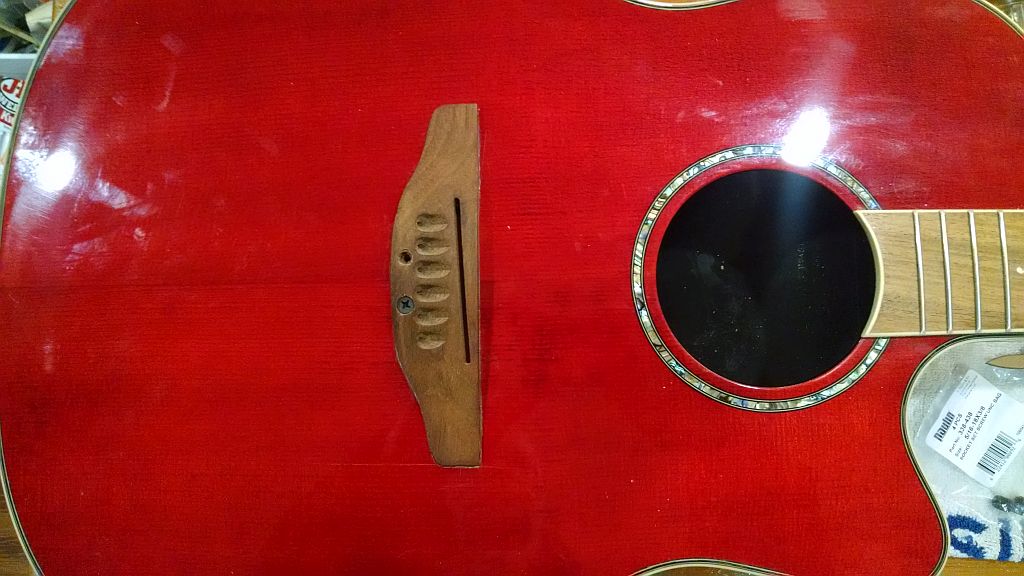
It's extremely shallow and tight in there but I stuck the phone cam inside and crossed my fingers. After a little picture processing, I got a fairly decent shot of the installation so you can see what's going on:
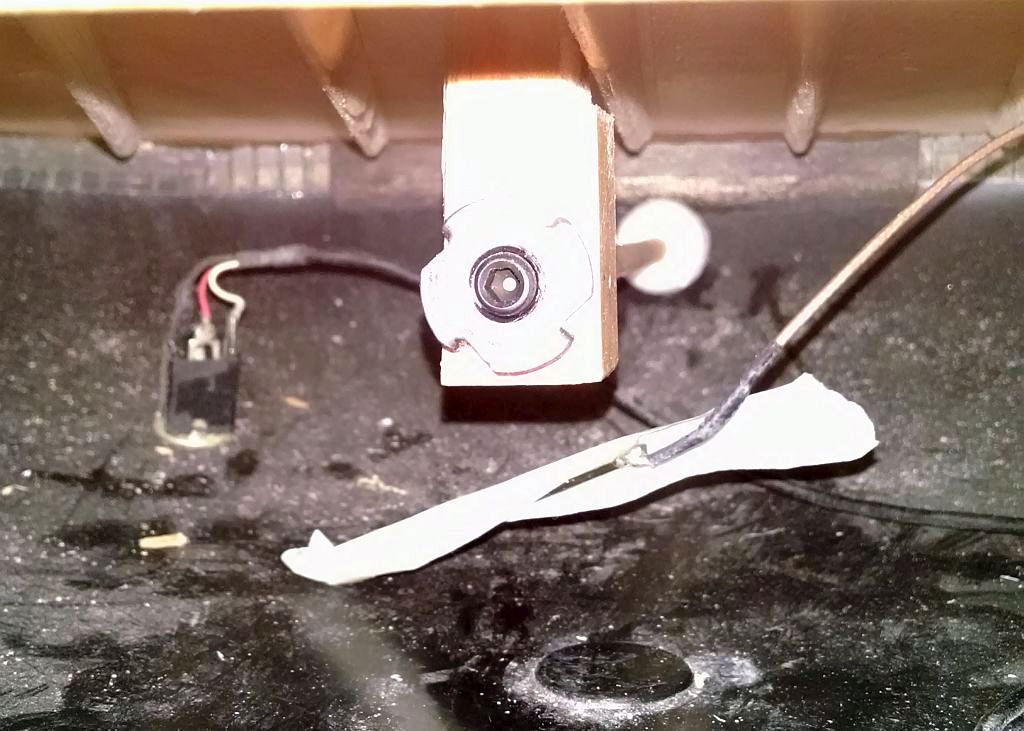
The wire laying in front is the piezo pickup wrapped in masking tape. The white and red wires in the back are to the jack.
Looks like the Styrofoam ball is going to work just fine. It stops the the dowel end from putting pin point pressure on the plastic and possibly causing problems with slipping or punctures. And it offers enough compression resistance without collapsing.
And happily, it's in the right place, right on the plastic shell and not on the joint seam!
As it now sits it is finger tight, and there is adequate adjustment using a hex wrench to snug it up some more after the bridge is glued down if needed.
Whew!
Now I'm waiting for a bridge caul which has been on a slow boat from China for a month.
I could attempt the clamp down without it but I would not be able to put pressure on the bridge "wings" and I do not want to have a repeat bridge failure!
From the outside not much different except for the screw head:

It's extremely shallow and tight in there but I stuck the phone cam inside and crossed my fingers. After a little picture processing, I got a fairly decent shot of the installation so you can see what's going on:

The wire laying in front is the piezo pickup wrapped in masking tape. The white and red wires in the back are to the jack.
Looks like the Styrofoam ball is going to work just fine. It stops the the dowel end from putting pin point pressure on the plastic and possibly causing problems with slipping or punctures. And it offers enough compression resistance without collapsing.
And happily, it's in the right place, right on the plastic shell and not on the joint seam!
As it now sits it is finger tight, and there is adequate adjustment using a hex wrench to snug it up some more after the bridge is glued down if needed.
Whew!

Now I'm waiting for a bridge caul which has been on a slow boat from China for a month.
I could attempt the clamp down without it but I would not be able to put pressure on the bridge "wings" and I do not want to have a repeat bridge failure!
_________________
"A little song. A little dance. A little seltzer down your pants." -Chuckles the Clown

GUITARS : https://legend.barryeames.com
MUSIC/PIX/VIDEOS: https://getback.barryeames.com (including Spectrum ST)
 Re: Ovation Celebrity CC28 for Repair
That all looks quite promising; nice work, skippy!!

corsair- Senior Member
- Number of posts : 6329
Age : 65
Location : Mount Hunter, NSW, Australia
Registration date : 2008-04-08
 Re: Ovation Celebrity CC28 for Repair
How's that gonna work with only one contact point under the bridge?
 Re: Ovation Celebrity CC28 for Repair
The screw is a mechanical fastening.Westbone wrote:How's that gonna work with only one contact point under the bridge?
It pulls the top of the wooden block up against the soundboard under the bridge. That surface area is the point of contact.
The compression on the dowel is what puts a downward pull on the bridge to stabilize everything.
The added benefit is that the BD acts as a tone post which boosts the volume. It certainly did on my Vantage 12 string!
But that volume increase works when the plain dowel end makes contact with the wooden end block in a "normal" guitar (wood to wood).
I don't know if that Styrofoam ball will transmit the vibration in the same way here. That's why I mentioned earlier that my preference is for a suitable small wooden knob. That can always be swapped out later if needed.
In any event volume boost is a bonus. The primary purpose is to stabilize the bridge!
If you really wanted to make it permanent I guess you could glue the block to the soundboard, but of course, that that makes it virtually impossible to remove without destroying the top.
_________________
"A little song. A little dance. A little seltzer down your pants." -Chuckles the Clown

GUITARS : https://legend.barryeames.com
MUSIC/PIX/VIDEOS: https://getback.barryeames.com (including Spectrum ST)
 Re: Ovation Celebrity CC28 for Repair
With only one contact point under the bridge it's virtually doing nothing to stop it going belly up again.
 Re: Ovation Celebrity CC28 for Repair
Damian, you'd be in the minority opinion on that.
The Bridge Doctor design and experience says otherwise.
The only deviation I made in my build was in not using the nylon rod to anchor the screw (couldn't find anything suitable). That offers a more solid grip on the screw so I'll likely pump a bit of glue into the wood to help strengthen the threads.
But only one screw is needed. Even on my 12 string!
It looks counter intuitive but the physics do work, at least in a "normal" guitar.
This one? Who knows?
It's a bit of a gamble but it should do the trick on such a lightweight structure as this.
_________________
"A little song. A little dance. A little seltzer down your pants." -Chuckles the Clown

GUITARS : https://legend.barryeames.com
MUSIC/PIX/VIDEOS: https://getback.barryeames.com (including Spectrum ST)
 Re: Ovation Celebrity CC28 for Repair
The bridge doctor design does work.
It has two contact points below the bridge. One pulling one pushing.
How many contact points does yours have?
Your photos are not all that clear about whats going on under there.
It looks like one screw only on the rear of the bridge. I know you have another hole for a screw but not talking about that.
Does it also contact the front of the bridge?
Good luck with it though.
 Re: Ovation Celebrity CC28 for Repair
Hmm, I thought it was clear enough from my description and the pictures. 
The BD works by gently pulling the bridge down and stabilizing it.
There is one screw used only.
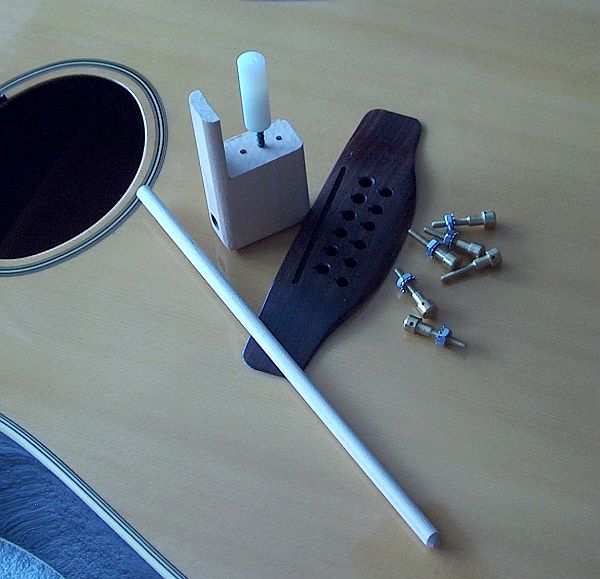
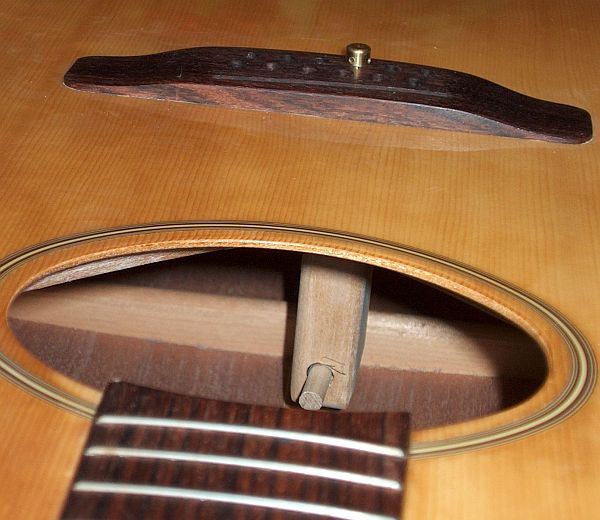
There are two versions of the BD.
Mine has brass pins which allows you to use the existing bridge pin holes to fasten the BD.
The string then goes through the brass pin which is above the bridge. And yes it buggers up the break angle which is why I elected to use only one of them. (You can replace all the pins if desired and it helps lessen the tension on the bridge in severe cases.)
The other version simply uses a wood screw through the bridge and covers the head with a pearloid dot.
Again, remember the Ovation uses a pinless bridge, hence the screw.
My design doesn't use the nylon rod but will screw directly into the wooden block. That will fasten it tight to the surface of the soundboard. That is the "contact" point.
The original BD design is forked into 2 contact points simply to accommodate for adjustment of the nylon rod which anchors the screw.
The small wood "foot" that touches the bridge plate serves two purposes:
1) stability 2) sound transmission.
The top surface of my wood block replaces the combined area of those two "contact points" and if anything adds a bit more. Remember there is no bridge plate in this guitar, so the extra support is a bonus.
The jury's out as to whether I'll get any volume boost benefit but that isn't the primary goal here.

The BD works by gently pulling the bridge down and stabilizing it.
There is one screw used only.
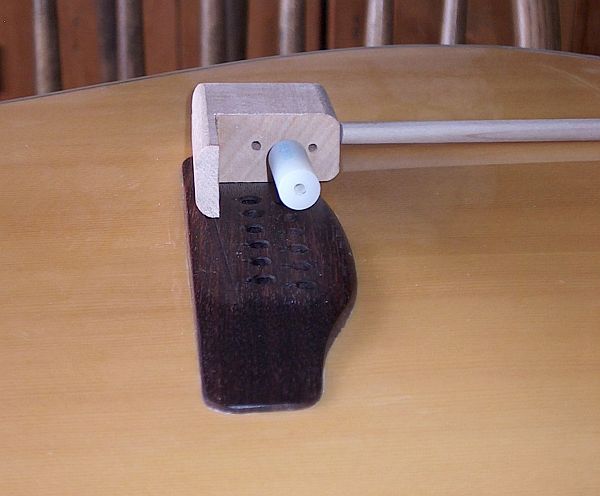
For those not familiar with the Bridge Doctor here are a few pictures of my installation in my Vantage VA30N-12:


There are two versions of the BD.
Mine has brass pins which allows you to use the existing bridge pin holes to fasten the BD.
The string then goes through the brass pin which is above the bridge. And yes it buggers up the break angle which is why I elected to use only one of them. (You can replace all the pins if desired and it helps lessen the tension on the bridge in severe cases.)
The other version simply uses a wood screw through the bridge and covers the head with a pearloid dot.
Again, remember the Ovation uses a pinless bridge, hence the screw.
My design doesn't use the nylon rod but will screw directly into the wooden block. That will fasten it tight to the surface of the soundboard. That is the "contact" point.
The original BD design is forked into 2 contact points simply to accommodate for adjustment of the nylon rod which anchors the screw.
The small wood "foot" that touches the bridge plate serves two purposes:
1) stability 2) sound transmission.
The top surface of my wood block replaces the combined area of those two "contact points" and if anything adds a bit more. Remember there is no bridge plate in this guitar, so the extra support is a bonus.
The jury's out as to whether I'll get any volume boost benefit but that isn't the primary goal here.
_________________
"A little song. A little dance. A little seltzer down your pants." -Chuckles the Clown

GUITARS : https://legend.barryeames.com
MUSIC/PIX/VIDEOS: https://getback.barryeames.com (including Spectrum ST)
 Re: Ovation Celebrity CC28 for Repair
Just a block screwed under the bridge then.
Might help spread the load a bit.
Might help spread the load a bit.
 Re: Ovation Celebrity CC28 for Repair
Now ya got it!

That's fundamentally what a BD is!
If my light weight version functions close to the original design I'm happy with it.

That's fundamentally what a BD is!
If my light weight version functions close to the original design I'm happy with it.
_________________
"A little song. A little dance. A little seltzer down your pants." -Chuckles the Clown

GUITARS : https://legend.barryeames.com
MUSIC/PIX/VIDEOS: https://getback.barryeames.com (including Spectrum ST)
 Re: Ovation Celebrity CC28 for Repair
I know how a bridge doctor works... 
Lets make it clear.
The screw in the bridge pulls the rear of the bridge down when you tighten the dowel screw.
The solid section pushes the front up when you tighten the dowel.
Hence keeping the whole bridge 'straight' on the guitar top preventing a belly and is fully adjustable in the future.
A block of wood under the bridge, the jury's out...but good luck.
 Re: Ovation Celebrity CC28 for Repair
Geezus Damian, why do you want to give me so much grief over something I'm doing?
This is supposed to be a fun project on a NON STANDARD guitar construction, and maybe educate a few folks along the way, including myself.
I'm improvising here.
But I'm not completely pissing into the wind, I have some experience.
Give me a break FFS!
Meantime I'll I'll take the luck you send.
This is supposed to be a fun project on a NON STANDARD guitar construction, and maybe educate a few folks along the way, including myself.
I'm improvising here.
But I'm not completely pissing into the wind, I have some experience.
Give me a break FFS!
Meantime I'll I'll take the luck you send.
_________________
"A little song. A little dance. A little seltzer down your pants." -Chuckles the Clown

GUITARS : https://legend.barryeames.com
MUSIC/PIX/VIDEOS: https://getback.barryeames.com (including Spectrum ST)
 Re: Ovation Celebrity CC28 for Repair
Just a point of view.
Is that not allowed on this forum....not pc enough...
Don't get so touchy.
Is that not allowed on this forum....not pc enough...
Don't get so touchy.
 Re: Ovation Celebrity CC28 for Repair
Easy now, chaps...
Personally, I like the repair and especially the ethos under which it’s being done; doesn’t mean I don’t appreciate what Damian’s saying though!!
Personally, I like the repair and especially the ethos under which it’s being done; doesn’t mean I don’t appreciate what Damian’s saying though!!

corsair- Senior Member
- Number of posts : 6329
Age : 65
Location : Mount Hunter, NSW, Australia
Registration date : 2008-04-08
 Re: Ovation Celebrity CC28 for Repair
Alrighty then.
This is the last I'll say on the subject of the Bridge Doctor and you can take it for what it's worth, I'm weary of having the joy of working on this project sapped by all the negativity.
Please have a look at this article which was the inspiration for my design attempt. LINK
This particular bridge doctor was made for a Ukulele "after a great talk with Steve Henderson at Breedlove Guitars" and features a solid block against the bridge.
(For those who may not know, Breedlove Guitars include a Bridge Doctor as an integral part of the design of many of their models. We sold Breedlove at the shop for a time and I can confirm this.)
A Uke is not a guitar, but the fellow here is talking about 6 and 8 string Ukes, which create considerably more tension than the common 4 string type and are prone to the same bellying up problem.
My Ovation model is extremely lightweight and ridiculously shallow. And its thin, fan-style bracing is nearly identical to the Ukulele in the photos.
So using the same approach is a no-brainer and is not unreasonable at all.
I've already explained why there are "2 points of contact" in the original BD, it's for adjustment during installation. Those points do not move independently. That's physically impossible since they're part of the same block mass.
It is not a requirement to have 2 points as the entire block surface rotates in the same way and does exactly the same thing over a greater area.
I expect that the bridge will remain stable.
Peace out.
_________________
"A little song. A little dance. A little seltzer down your pants." -Chuckles the Clown

GUITARS : https://legend.barryeames.com
MUSIC/PIX/VIDEOS: https://getback.barryeames.com (including Spectrum ST)
 Re: Ovation Celebrity CC28 for Repair
Nothing to shake a stick with a foam ball at.
Hope it all works out for ya.....
Hope it all works out for ya.....
 Moving on...slowly
Thanks Damian.
And on that point:
I finally sourced a supply of wooden balls!!
So it's bye-bye to the foam stick. . .
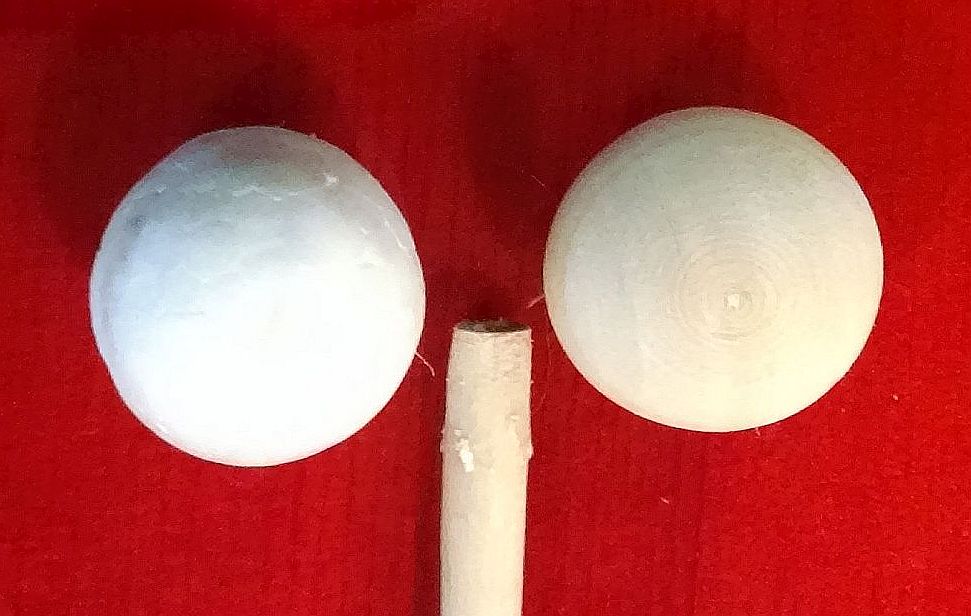
and hello to the drum stick!

That's the good news.
The bad news is I had to buy a package of 16 of the bloody things to get that one! Now I have a bag of Styrofoam balls and wooden balls.
Ah BALLS!
I've also been trying to carve some deeper scratches into the finish in prep for the glue up. S-l-o-w going and hard on the fingers gripping the small end of the round file I'm using. That's about the only thing I have that will dig into this finish:
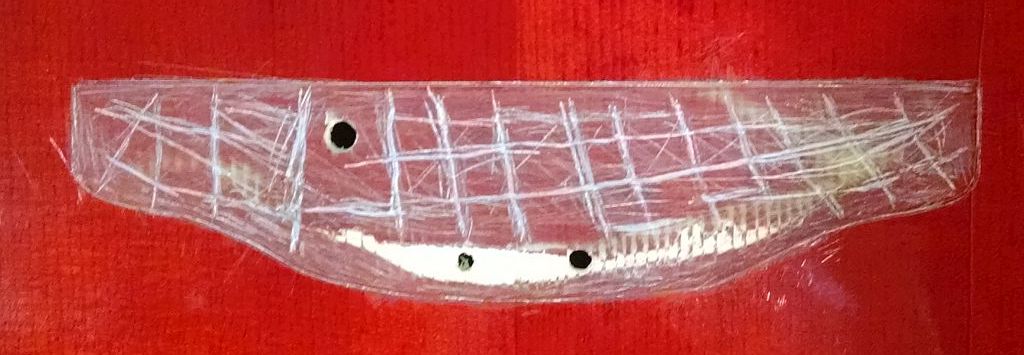
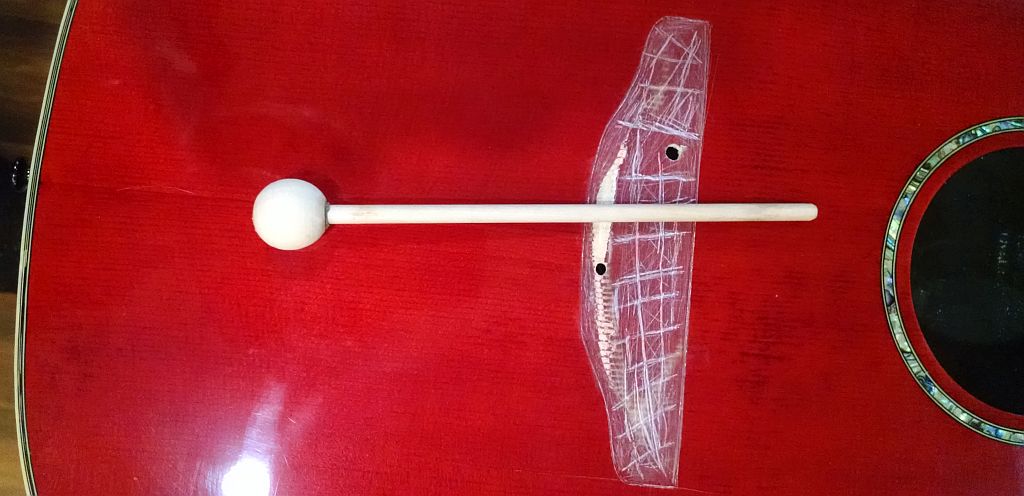
I think that the foam end would have worked, but not well. I am hoping that the wood will transmit the bridge energy much better, and of course it will not compress over time.
Again, the reason for it in the first place is to allow the end to move more freely on the bowl and avoid accidentally piercing the joint between the top and bowl. The extra weight probably won't hurt neither.
Getting close now.
And on that point:
I finally sourced a supply of wooden balls!!
So it's bye-bye to the foam stick. . .

and hello to the drum stick!

That's the good news.
The bad news is I had to buy a package of 16 of the bloody things to get that one! Now I have a bag of Styrofoam balls and wooden balls.
Ah BALLS!
I've also been trying to carve some deeper scratches into the finish in prep for the glue up. S-l-o-w going and hard on the fingers gripping the small end of the round file I'm using. That's about the only thing I have that will dig into this finish:


I think that the foam end would have worked, but not well. I am hoping that the wood will transmit the bridge energy much better, and of course it will not compress over time.
Again, the reason for it in the first place is to allow the end to move more freely on the bowl and avoid accidentally piercing the joint between the top and bowl. The extra weight probably won't hurt neither.
Getting close now.
_________________
"A little song. A little dance. A little seltzer down your pants." -Chuckles the Clown

GUITARS : https://legend.barryeames.com
MUSIC/PIX/VIDEOS: https://getback.barryeames.com (including Spectrum ST)
 Some more prep work
I glued a piece of veneer that I had available into the bottom of the slot to create a new saddle "floor". I hope that addresses the issue of isolating the piezo from direct contact with the sound board.
Kinda white though so I hope it doesn't get confused with a shim sometime down the road:

Both surfaces have been scuffed up and cleaned with Naptha.
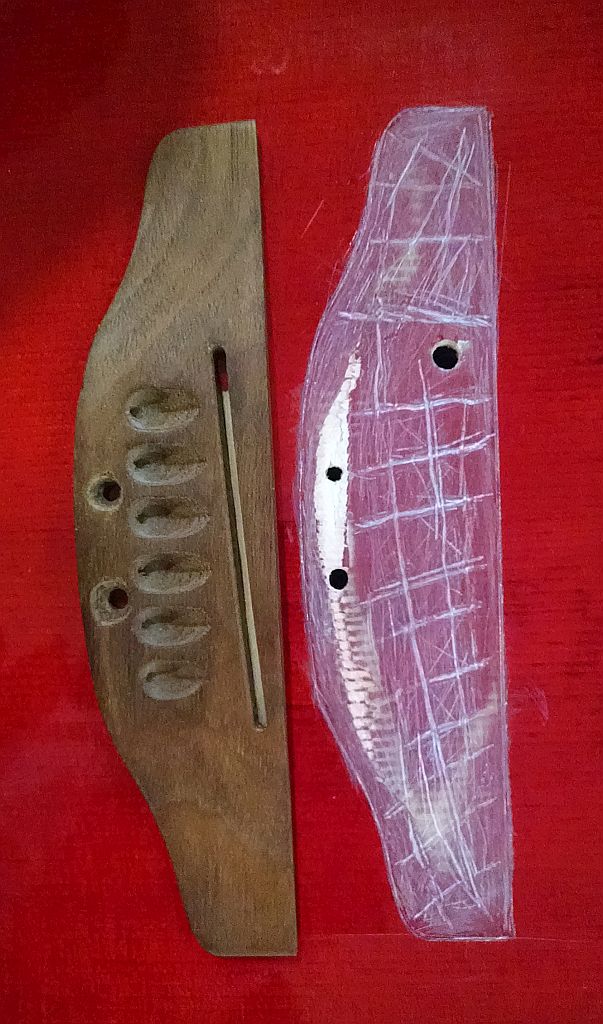
Still waiting on the bridge caul...
Kinda white though so I hope it doesn't get confused with a shim sometime down the road:

Both surfaces have been scuffed up and cleaned with Naptha.

Still waiting on the bridge caul...
_________________
"A little song. A little dance. A little seltzer down your pants." -Chuckles the Clown

GUITARS : https://legend.barryeames.com
MUSIC/PIX/VIDEOS: https://getback.barryeames.com (including Spectrum ST)
 Re: Ovation Celebrity CC28 for Repair
Barry wrote:
I finally sourced a supply of wooden balls!!
That's the good news.
The bad news is I had to buy a package of 16 of the bloody things to get that one! Now I have a bag of Styrofoam balls and wooden balls.
Ah BALLS!
 Why dont you just buy 15 more Ovations to fix up

challpa- Financial supporter
- Number of posts : 220
Age : 57
Location : Brisbane Queensland Australia
Registration date : 2008-05-30
 Re: Ovation Celebrity CC28 for Repair
That awful thought did cross my mind. 

_________________
"A little song. A little dance. A little seltzer down your pants." -Chuckles the Clown

GUITARS : https://legend.barryeames.com
MUSIC/PIX/VIDEOS: https://getback.barryeames.com (including Spectrum ST)
 Another Delay
I have been waiting 5 weeks for a bridge caul from (where else?) China, that I need for both this project and another one.
And wouldn't cha know it? I find out now that the damn thing was lost in transit!
So they are gonna send another one.
Gawd only knows how much longer I need to wait, especially in light of everything that's happening with COVID-19 world wide.
I'm tempted to try without it and rig something up, but I only have the one deep throat clamp and I cannot get sufficient pressure on the bridge "wings" without a lot of fiddling.
Bloody 'ell.
And wouldn't cha know it? I find out now that the damn thing was lost in transit!

So they are gonna send another one.
Gawd only knows how much longer I need to wait, especially in light of everything that's happening with COVID-19 world wide.
I'm tempted to try without it and rig something up, but I only have the one deep throat clamp and I cannot get sufficient pressure on the bridge "wings" without a lot of fiddling.
Bloody 'ell.

_________________
"A little song. A little dance. A little seltzer down your pants." -Chuckles the Clown

GUITARS : https://legend.barryeames.com
MUSIC/PIX/VIDEOS: https://getback.barryeames.com (including Spectrum ST)
 Re: Ovation Celebrity CC28 for Repair
Easy to make one or more from stuff you might have laying around.
https://www.pinterest.de/pin/413557178266873045/
https://www.pinterest.de/pin/413557178266873045/

ExFender- Financial supporter
- Number of posts : 212
Age : 78
Location : Germany
Registration date : 2019-10-30
 Re: Ovation Celebrity CC28 for Repair
Thanks but I cannot see much there that would be too helpful.
I know there are a bazzilion ways to clamp something but the Ovation demands a bit of a different approach. And I really do not want to invest a lot of time making a custom tool which will never be used again.
The item I ordered is for a pinned bridge but it can be adapted for this one OK. And as I said, I have another bridge to fix as well so it will be well used.
_________________
"A little song. A little dance. A little seltzer down your pants." -Chuckles the Clown

GUITARS : https://legend.barryeames.com
MUSIC/PIX/VIDEOS: https://getback.barryeames.com (including Spectrum ST)
 Re: Ovation Celebrity CC28 for Repair
Big, fark-off nut and bolt through each wing?!
Not helpful?
Sorry...
Not helpful?
Sorry...

corsair- Senior Member
- Number of posts : 6329
Age : 65
Location : Mount Hunter, NSW, Australia
Registration date : 2008-04-08
 Re: Ovation Celebrity CC28 for Repair
There are times when it is tempting....but no farking way. 

_________________
"A little song. A little dance. A little seltzer down your pants." -Chuckles the Clown

GUITARS : https://legend.barryeames.com
MUSIC/PIX/VIDEOS: https://getback.barryeames.com (including Spectrum ST)
 Minor BD Update
I'm still waiting for the bridge caul to arrive from China. . . 
Meanwhile, since I have even less of a life than normal thanks to Covid-19, I've been revisiting several of my guitars, repairing, replacing, tweeking, restringing, etc. just trying to stay relatively sane, ya know?
The Ovation has been sitting in its stand, waiting, and I swear I heard it whisper at me the other day
The only good thing about the delay is that there is lots of time to think and rethink everything. That can drive you slightly mad but sometimes it sharpens the focus too. In this case, I re-thought the depth of the block on my "Bridge Doctor".
I added the wooden ball end to avoid accidentally punching through the kerfing or anything else, but I realized that the original block depth that I made was too long and caused the ball to hit the curve on the bowl. That would actually make things worse because the ball would travel UP and in turn torque the bridge forward towards the sound hole! Not good.
So, I re-cut the block to shorten it and now the ball rests in just about the optimum place available and should not travel at all.
Here are some dry-fit pictures (not the easiest place to see or light):
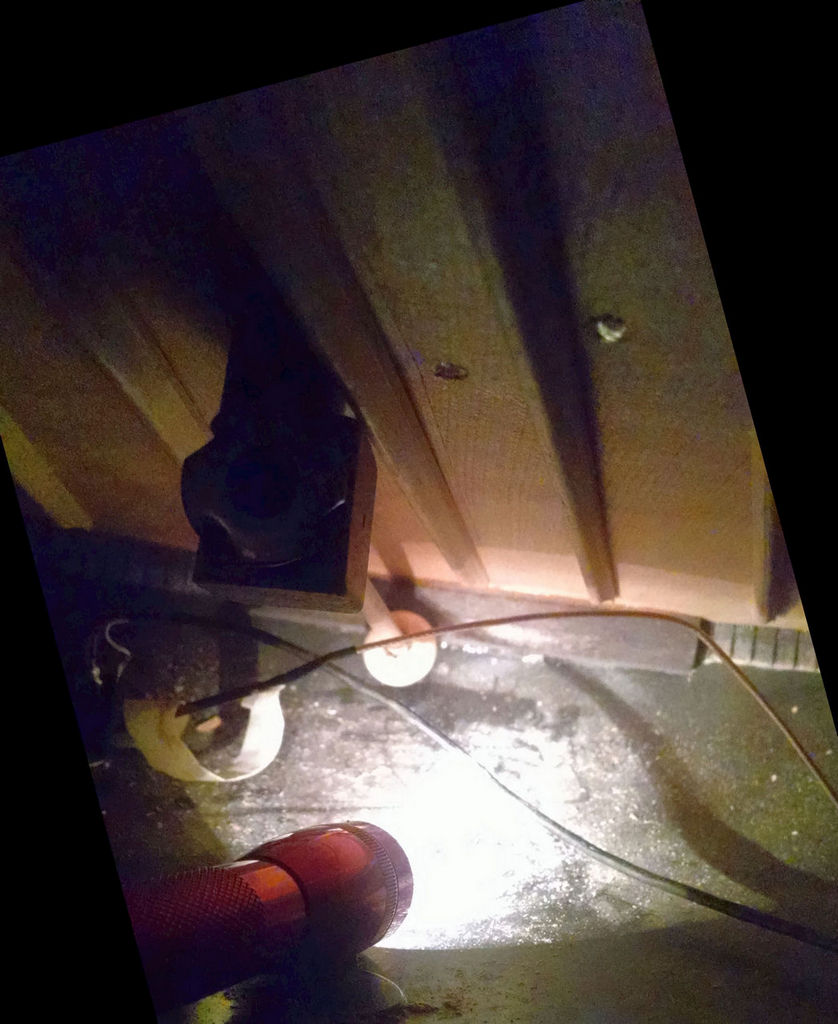

Looking into the inspection mirror and up at the block fastened to the bridge. Note how close this is to the brace. I had to notch the block in order to fit around it:
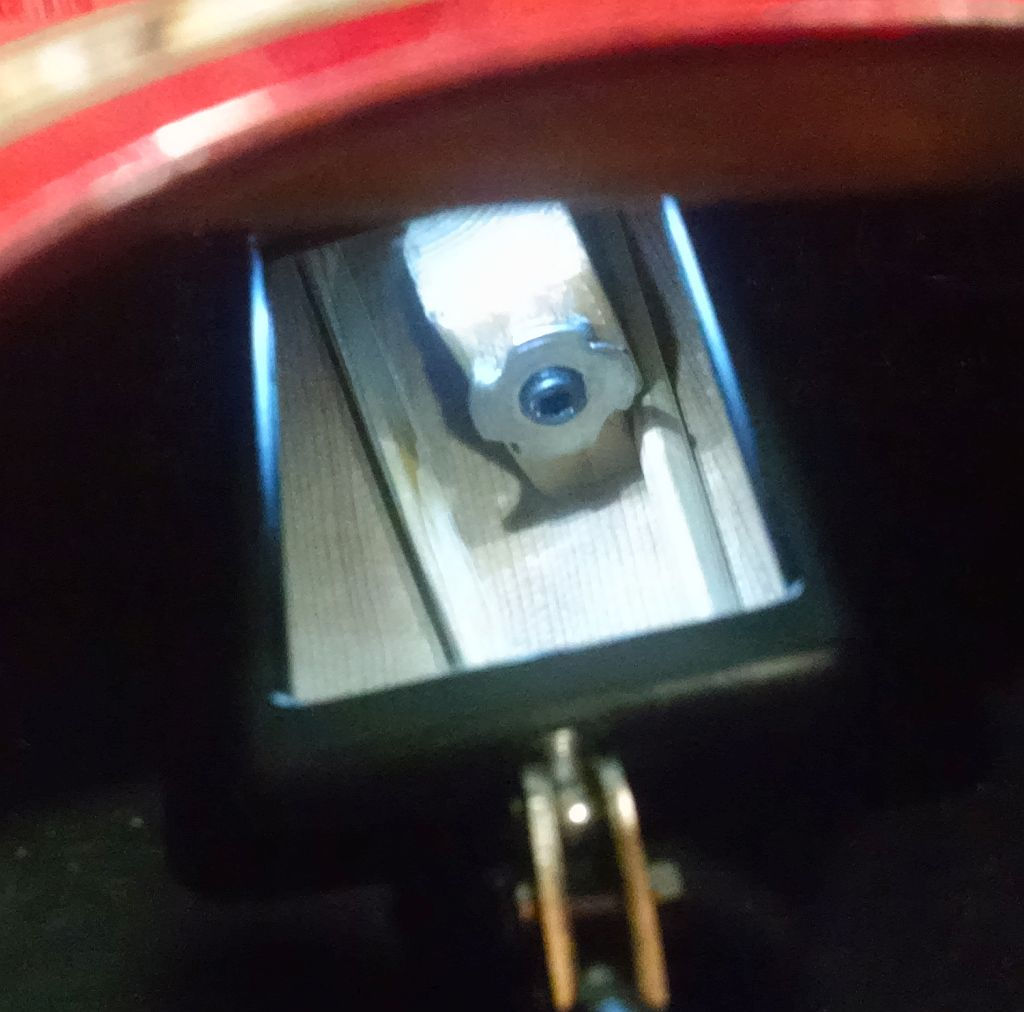
It ain't purty but this should stabilize the bridge once it's glued down. I still have a bit of sanding to do on the bridge to make it fit the new surface contour then it'll be ready for gluin' n clampin'.

Meanwhile, since I have even less of a life than normal thanks to Covid-19, I've been revisiting several of my guitars, repairing, replacing, tweeking, restringing, etc. just trying to stay relatively sane, ya know?
The Ovation has been sitting in its stand, waiting, and I swear I heard it whisper at me the other day

The only good thing about the delay is that there is lots of time to think and rethink everything. That can drive you slightly mad but sometimes it sharpens the focus too. In this case, I re-thought the depth of the block on my "Bridge Doctor".
I added the wooden ball end to avoid accidentally punching through the kerfing or anything else, but I realized that the original block depth that I made was too long and caused the ball to hit the curve on the bowl. That would actually make things worse because the ball would travel UP and in turn torque the bridge forward towards the sound hole! Not good.
So, I re-cut the block to shorten it and now the ball rests in just about the optimum place available and should not travel at all.
Here are some dry-fit pictures (not the easiest place to see or light):


Looking into the inspection mirror and up at the block fastened to the bridge. Note how close this is to the brace. I had to notch the block in order to fit around it:

It ain't purty but this should stabilize the bridge once it's glued down. I still have a bit of sanding to do on the bridge to make it fit the new surface contour then it'll be ready for gluin' n clampin'.

_________________
"A little song. A little dance. A little seltzer down your pants." -Chuckles the Clown

GUITARS : https://legend.barryeames.com
MUSIC/PIX/VIDEOS: https://getback.barryeames.com (including Spectrum ST)
 Re: Ovation Celebrity CC28 for Repair
Interesting video.
Read some of the comments also.
https://www.youtube.com/watch?v=oRW357u29Hw
Read some of the comments also.
https://www.youtube.com/watch?v=oRW357u29Hw
 Re: Ovation Celebrity CC28 for Repair
Thanks.
Yeah, I've been subscribed to Jerry's channel for quite awhile now. He's a solid, straight up, honest individual with a ton of experience and I have a lot of respect for what he does.
I think I've viewed (nearly all) of his guitar repair videos and I'm amazed at how he manages to restore things that most folks would just throw away.
I like him because he's extremely resourceful and hard working despite several handicaps, including colour blindness! Learned a lot from his work.
Highly recommended viewing!

_________________
"A little song. A little dance. A little seltzer down your pants." -Chuckles the Clown

GUITARS : https://legend.barryeames.com
MUSIC/PIX/VIDEOS: https://getback.barryeames.com (including Spectrum ST)
 Re: Ovation Celebrity CC28 for Repair
Indeed he certainly knows his stuff.
Informative with loads of advice.
Common sense with years of experience...
Informative with loads of advice.
Common sense with years of experience...
 Probable Ebay Scam
I finally reached the end of my patience this week! 
If you recall, I had been waiting 5 weeks for the original bridge caul/clamp from China. When I checked on the tracking number it failed to show anything past having left China.
The seller informs me it had been lost in transit and offered to resend it, but without a tracking number (Hmmm...)
I agreed since it would take the same time if I had re-ordered from another vender.
But here we are another 5 weeks and still nothing. Seller asks me politely to please wait a little longer.
I waited almost another week then requested a refund via eBay's dispute resolution. Ebay advises that the guaranteed refund period has now elapsed (quelle surprise!) and to contact the seller to work something out.
Seller now references the first shipment date and says that it should have arrived by now! Conveniently omitting reference to the 2nd promised shipment. Asks me to check the Post Office in case things are backed up because of the Pandemic, etc., etc.
My answer? No! Refund my money!
Three F%$#&*G months and I still have no caul, no money and I'm still looking at a disassembled guitar!
This has the earmarks of a scam. Just waiting now to see if my money shows up.
Thank goodness it isn't a lot, just the principle of the thing. Not crossing my fingers.
Meantime I have reordered from another vendor. And wait some more.
_________________
"A little song. A little dance. A little seltzer down your pants." -Chuckles the Clown

GUITARS : https://legend.barryeames.com
MUSIC/PIX/VIDEOS: https://getback.barryeames.com (including Spectrum ST)
 Re: Ovation Celebrity CC28 for Repair
Would it be appropriate to post the sellers moniker here to possibly help avoiding problems for others?

ExFender- Financial supporter
- Number of posts : 212
Age : 78
Location : Germany
Registration date : 2019-10-30
 Re: Ovation Celebrity CC28 for Repair
I may eventually do that Pete. I'm going to wait(!), a little bit, to see if eBay and/or the vendor responds positively. If not, yes I'll definitely name and shame them! 
In light of the pandemic situation, a little part of me doesn't want to be a complete arsehole in case it's a genuine global slowdown in deliveries. Then again, enough is enough and I don't see online orders dragging out this long anywhere else.

In light of the pandemic situation, a little part of me doesn't want to be a complete arsehole in case it's a genuine global slowdown in deliveries. Then again, enough is enough and I don't see online orders dragging out this long anywhere else.
_________________
"A little song. A little dance. A little seltzer down your pants." -Chuckles the Clown

GUITARS : https://legend.barryeames.com
MUSIC/PIX/VIDEOS: https://getback.barryeames.com (including Spectrum ST)
 Success!
Well what do ya know? Looks like the decision to wait a little bit longer was a good one.
Despite all the stalling and apparent shiftiness, the vendor finally came through with a refund.
I don't know if it was out of a sense good customer service or the fact that eBay was tracking the outcome(!) but today it arrived in my in box so I can finally stop concerning myself with it.
By comparison, my order with another Chinese vendor is already on a plane to me after only 3 days, with a valid tracking number! With luck it will get here sooner rather than later.
Also, with my luck the other shipment will mysteriously show up out of nowhere after 3 months too! If that should happen then I suppose the moral thing would be to pay for it. *sigh*
_________________
"A little song. A little dance. A little seltzer down your pants." -Chuckles the Clown

GUITARS : https://legend.barryeames.com
MUSIC/PIX/VIDEOS: https://getback.barryeames.com (including Spectrum ST)
 Well, wouldn't cha know it?
As soon as I lose my patience and freak out, look what shows up. On my birthday yet!
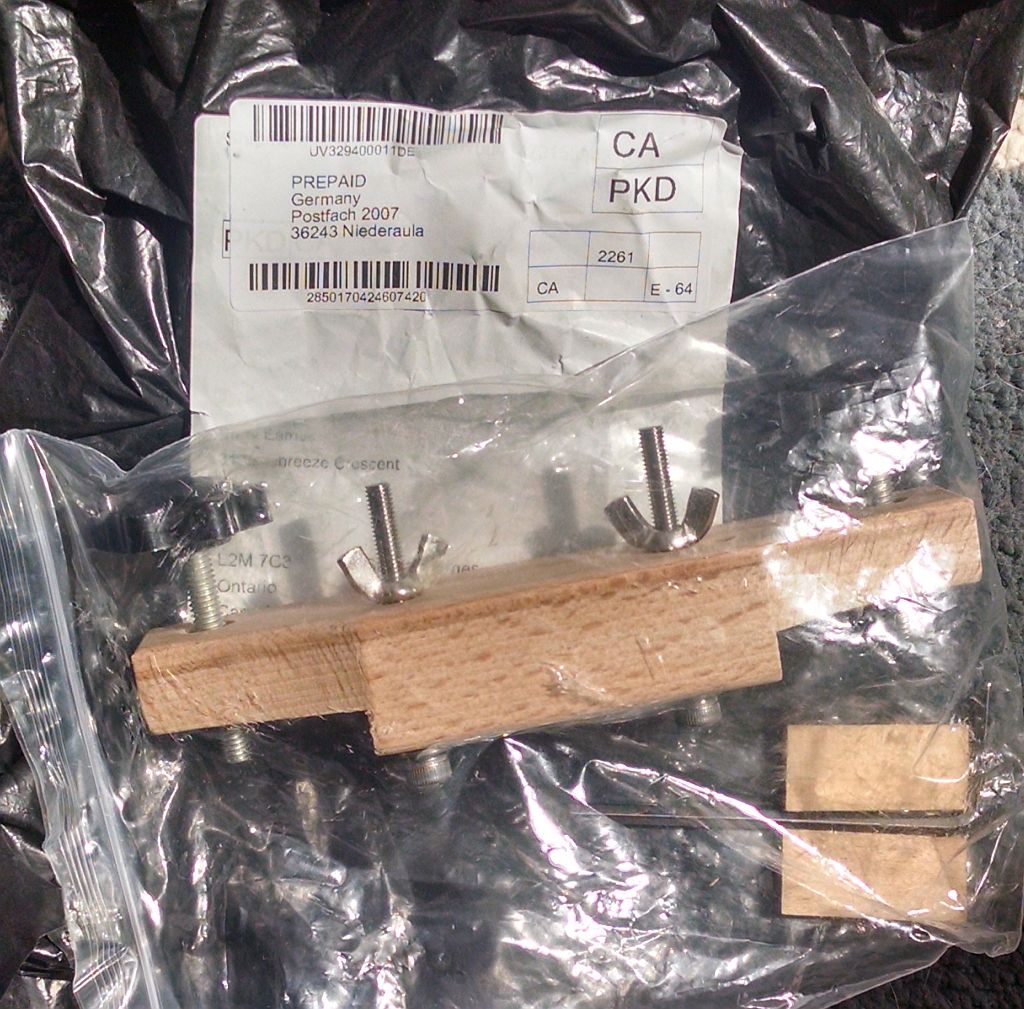
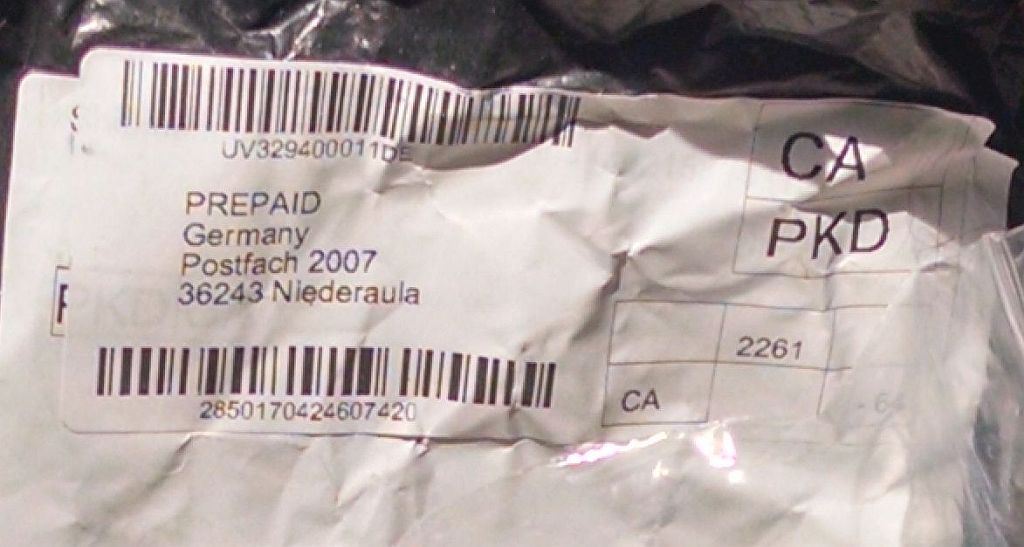
And look where it got routed through! Germany? WTF?
And this is what all the grief and upset was for:
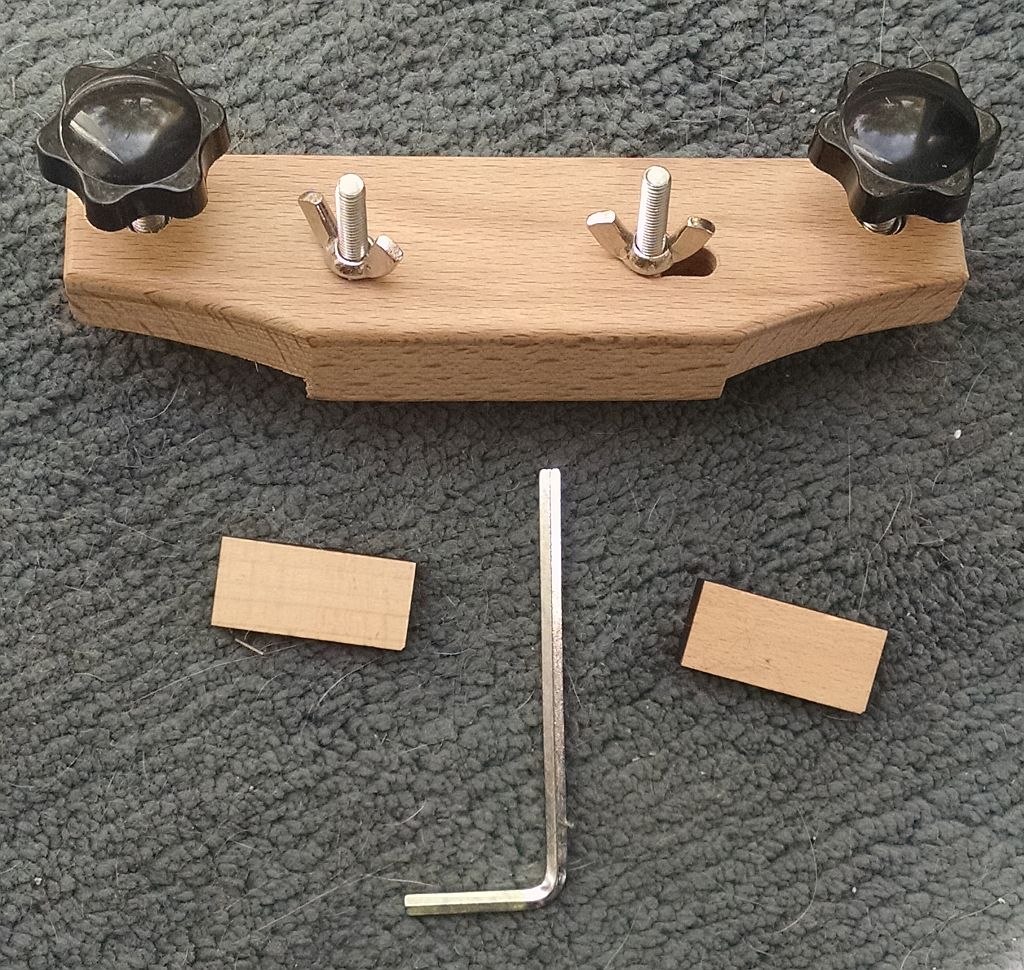
It's flippin' amazing that I can't get anything like this anywhere but China:
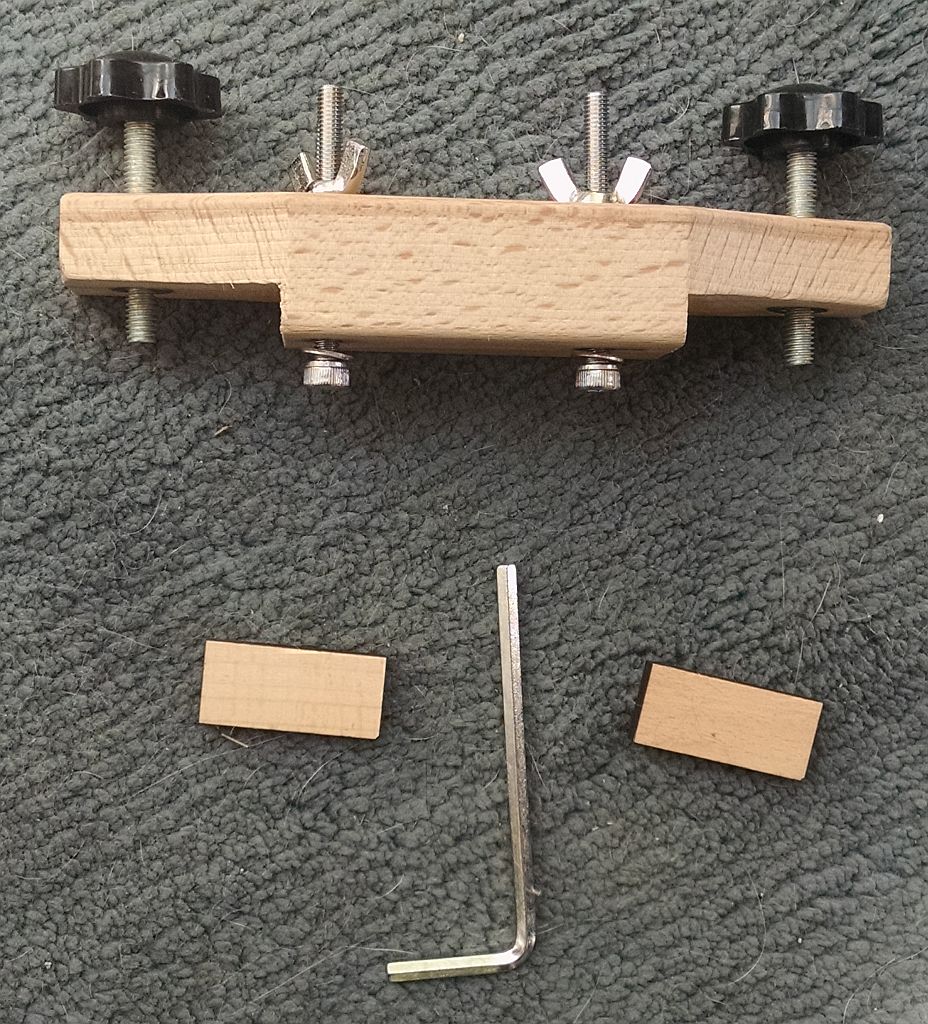
Of course you know what this means. I will soon have 2 of these things. Maybe even 3!

And look where it got routed through! Germany? WTF?

And this is what all the grief and upset was for:

It's flippin' amazing that I can't get anything like this anywhere but China:

Of course you know what this means. I will soon have 2 of these things. Maybe even 3!
_________________
"A little song. A little dance. A little seltzer down your pants." -Chuckles the Clown

GUITARS : https://legend.barryeames.com
MUSIC/PIX/VIDEOS: https://getback.barryeames.com (including Spectrum ST)
 Dry run
Getting close now.
Yesterday was my birthday so I wasn't in the mood to mess about with this project.
But here's a quick dry run of the clamping approach I'm taking for this nasty little bridge repair
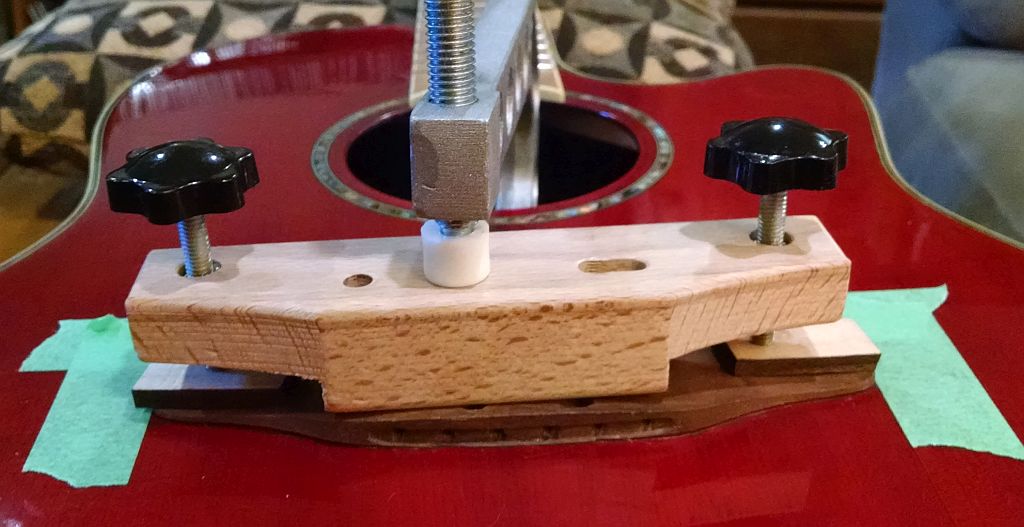
Because of the fan bracing I cannot position the C-clamp in the centre of the bridge where I'd prefer it to be so it's slightly off. I haven't fully adjusted the wing clamps on the caul in this picture but I can level things out using them so all should be OK.
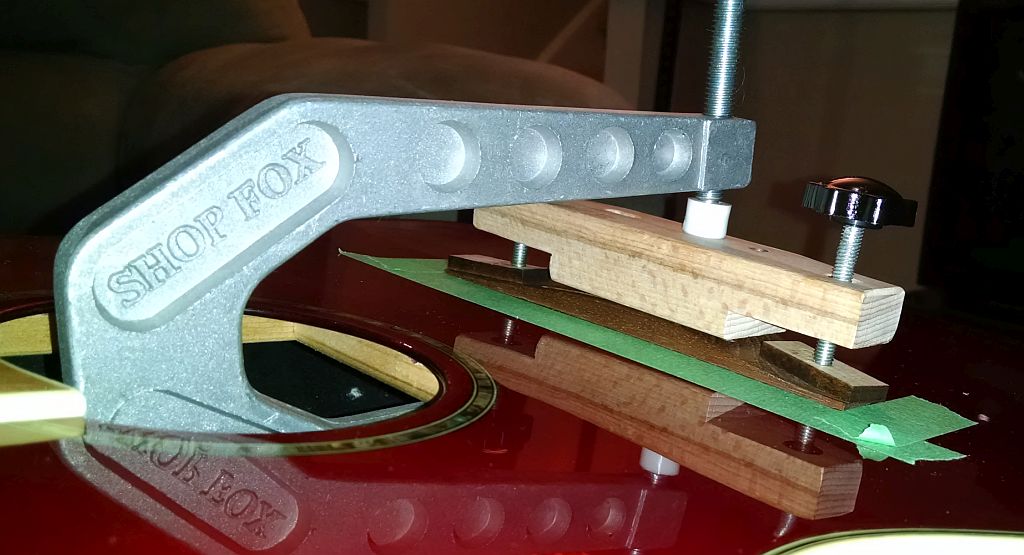
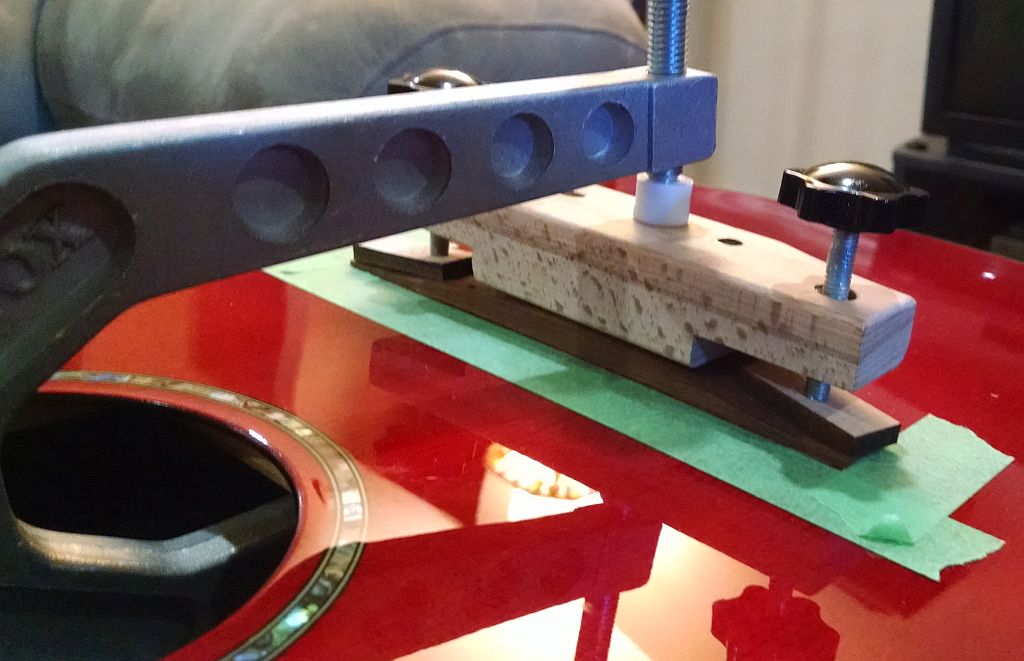
Now I need to be sure I can position this accurately before the epoxy sets up on me.
I'll also need to make sure that I get all the squeeze out on the finish, or, oh yes, there will be tears!
Yesterday was my birthday so I wasn't in the mood to mess about with this project.
But here's a quick dry run of the clamping approach I'm taking for this nasty little bridge repair

Because of the fan bracing I cannot position the C-clamp in the centre of the bridge where I'd prefer it to be so it's slightly off. I haven't fully adjusted the wing clamps on the caul in this picture but I can level things out using them so all should be OK.


Now I need to be sure I can position this accurately before the epoxy sets up on me.
I'll also need to make sure that I get all the squeeze out on the finish, or, oh yes, there will be tears!
_________________
"A little song. A little dance. A little seltzer down your pants." -Chuckles the Clown

GUITARS : https://legend.barryeames.com
MUSIC/PIX/VIDEOS: https://getback.barryeames.com (including Spectrum ST)
 Re: Ovation Celebrity CC28 for Repair
Excellent! Things are moving, mate!!

corsair- Senior Member
- Number of posts : 6329
Age : 65
Location : Mount Hunter, NSW, Australia
Registration date : 2008-04-08
 Re: Ovation Celebrity CC28 for Repair
'bout flippin' time eh? 
_________________
"A little song. A little dance. A little seltzer down your pants." -Chuckles the Clown

GUITARS : https://legend.barryeames.com
MUSIC/PIX/VIDEOS: https://getback.barryeames.com (including Spectrum ST)
 Dangerously close to sticking it down!
Well, the crappy spring weather we've been experiencing finally broke. The sun was shining, the birds were singing, and the squirrels were taking out their nuts. 
And I was finally able to move everything onto my workbench in the garage.
Before I make the commitment to epoxy which is a sink or swim moment with no second chance, I had to solve a few problems.
Primarily, I had to figure a way to locate the bridge before I clamped it down. Not an easy thing on this guitar.
Because I'm gluing wood to poly, it tends to be slippery.
I decided to do two things. First I used some thin dowels to locate the holes in the bridge, one of which is very important since the bridge doctor will connect there:
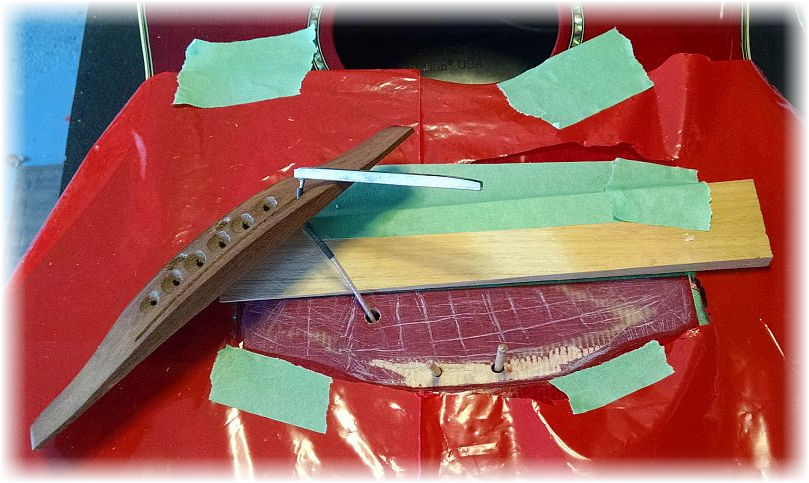
Second, I placed a straight piece of wood at the front edge in order to "triangulate" everything and give me a solid anchor.

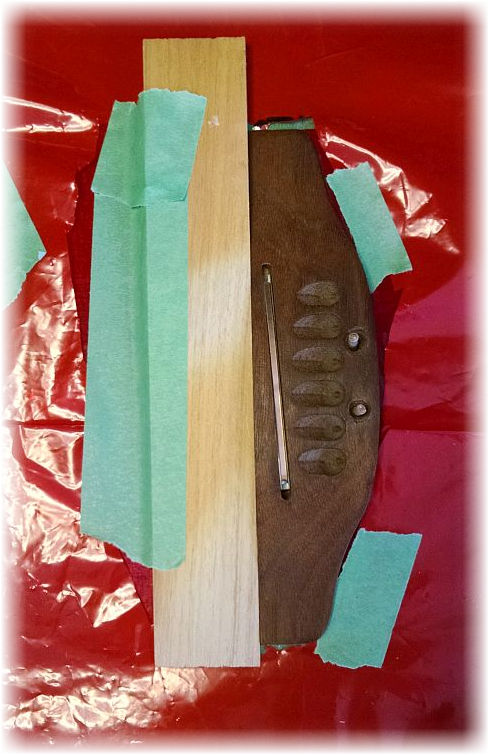
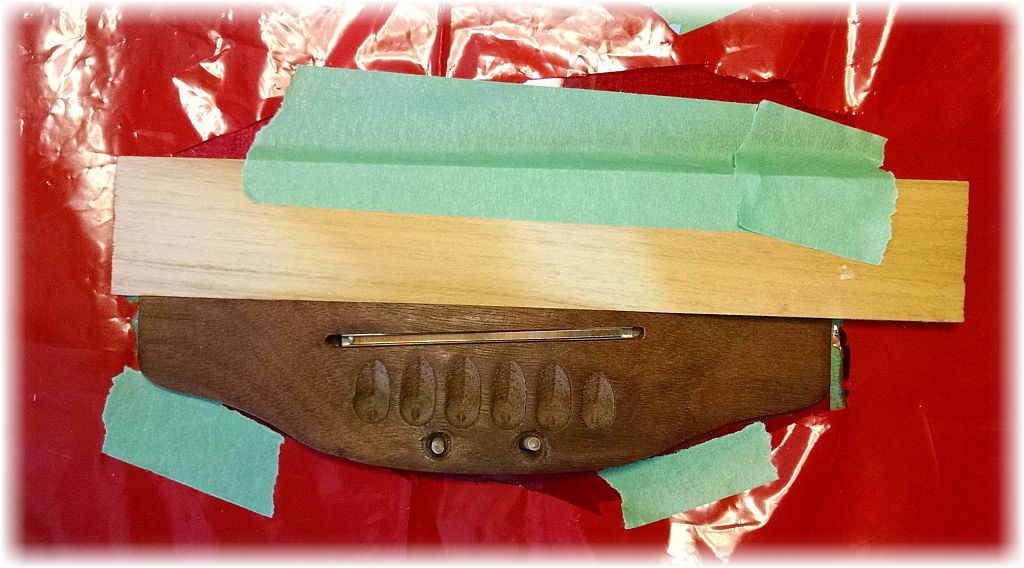
With any luck this will work, and once the clamp is in place I will pull out the wood strip and the dowels and clean the squeeze out. I'll only have about 5-6 minutes before the epoxy sets up so I hope I've thought of everything and remove what needs removing and clean up any mess in time.

And I was finally able to move everything onto my workbench in the garage.
Before I make the commitment to epoxy which is a sink or swim moment with no second chance, I had to solve a few problems.
Primarily, I had to figure a way to locate the bridge before I clamped it down. Not an easy thing on this guitar.
Because I'm gluing wood to poly, it tends to be slippery.
I decided to do two things. First I used some thin dowels to locate the holes in the bridge, one of which is very important since the bridge doctor will connect there:

Second, I placed a straight piece of wood at the front edge in order to "triangulate" everything and give me a solid anchor.


With any luck this will work, and once the clamp is in place I will pull out the wood strip and the dowels and clean the squeeze out. I'll only have about 5-6 minutes before the epoxy sets up so I hope I've thought of everything and remove what needs removing and clean up any mess in time.
_________________
"A little song. A little dance. A little seltzer down your pants." -Chuckles the Clown

GUITARS : https://legend.barryeames.com
MUSIC/PIX/VIDEOS: https://getback.barryeames.com (including Spectrum ST)
 Re: Ovation Celebrity CC28 for Repair
Good luck - Fingers and toes are crossed for you 


challpa- Financial supporter
- Number of posts : 220
Age : 57
Location : Brisbane Queensland Australia
Registration date : 2008-05-30
Page 2 of 3 •  1, 2, 3
 Similar topics
» Ovation Celebrity CC28 for Repair REDUX
» X390 Caspian Blue @ Guitar Center Cedar Rapids
» Fretboard repair
» For spares or repair
» ... and so it begins!!
» X390 Caspian Blue @ Guitar Center Cedar Rapids
» Fretboard repair
» For spares or repair
» ... and so it begins!!
Page 2 of 3
Permissions in this forum:
You cannot reply to topics in this forum|
|
|

 Website
 Facebook
