
 Website
 Facebook
Repairing a Bendmaster locking nut with Helicoils
+4
Racing
IanO
corsair
Iceman
8 posters
Page 1 of 1

Repairing a Bendmaster locking nut with Helicoils
![]() by Iceman Thu Apr 28, 2011 10:36 pm
by Iceman Thu Apr 28, 2011 10:36 pm
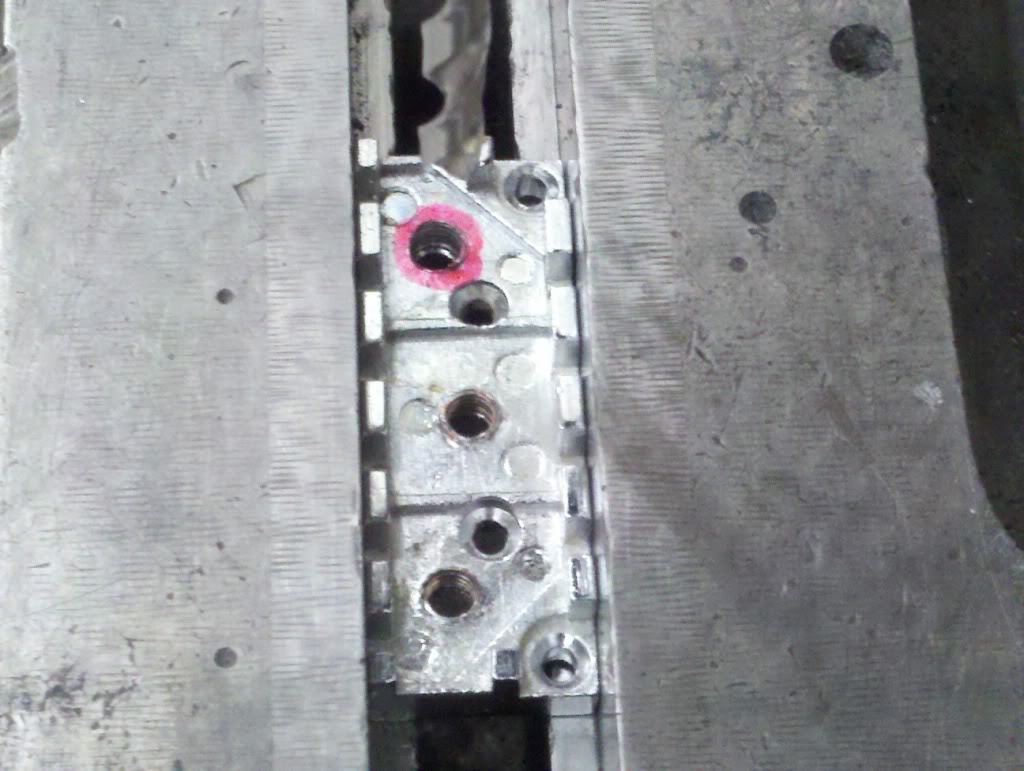
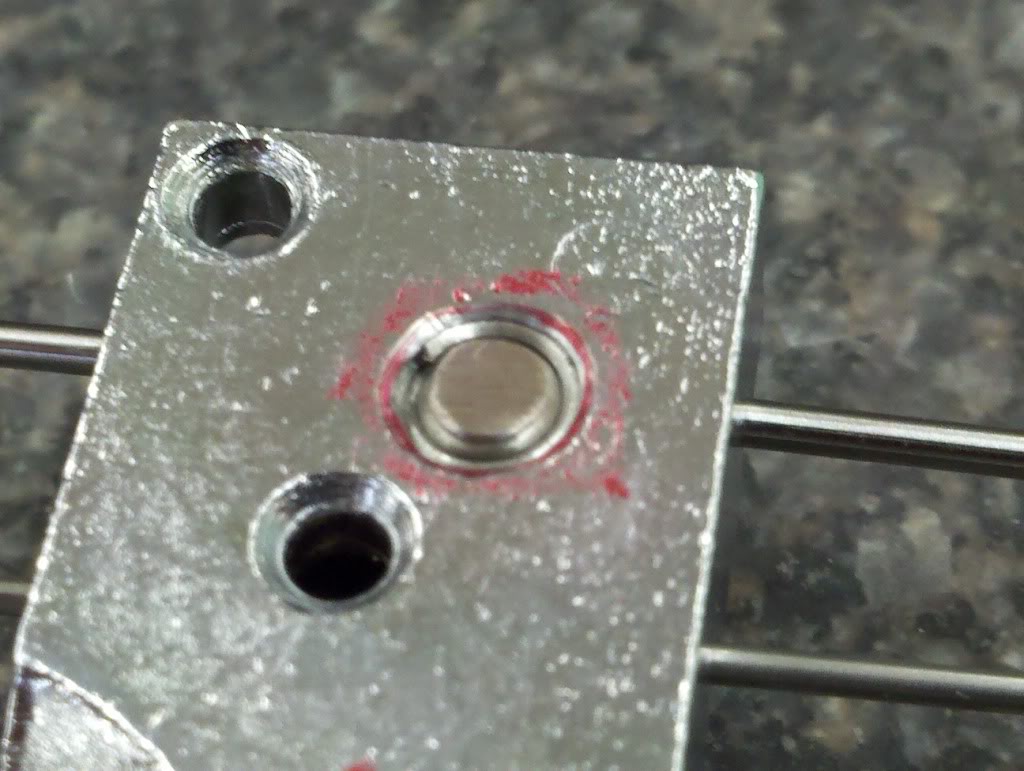
So here is a quick look at what I did to repair a stripped out tapped hole in the locking plate on my xa1530. This is a common problem with this plate I have found after reading about it here. Steve 777 posted some excellent observations about the need to customize the lengths of the 4mm bolts used to secure the lock plates, especially on the low E and A string as their diameters only allow for at best a shallow union between bolt and thread due to the length of the bolt being too short.
Helicoils are a quick way to repair a stripped out threaded hole, and since they are hardened steel I also drilled out and inserted them in the other 2 tapped holes in my plate to prevent this from happening in the future. Unless you have a VERY, VERY steady hand with a hand drill the use of a drill press for the first step is really the way to go. So.....
1.) Drill out the damaged tapped hole ( marked in red here ). The drill press is very handy for this step...
2.) Re-tap the oversized hole with the provided oversized tap. I am doing this by hand using a homemade tap guide block to aid in keeping things plumb...
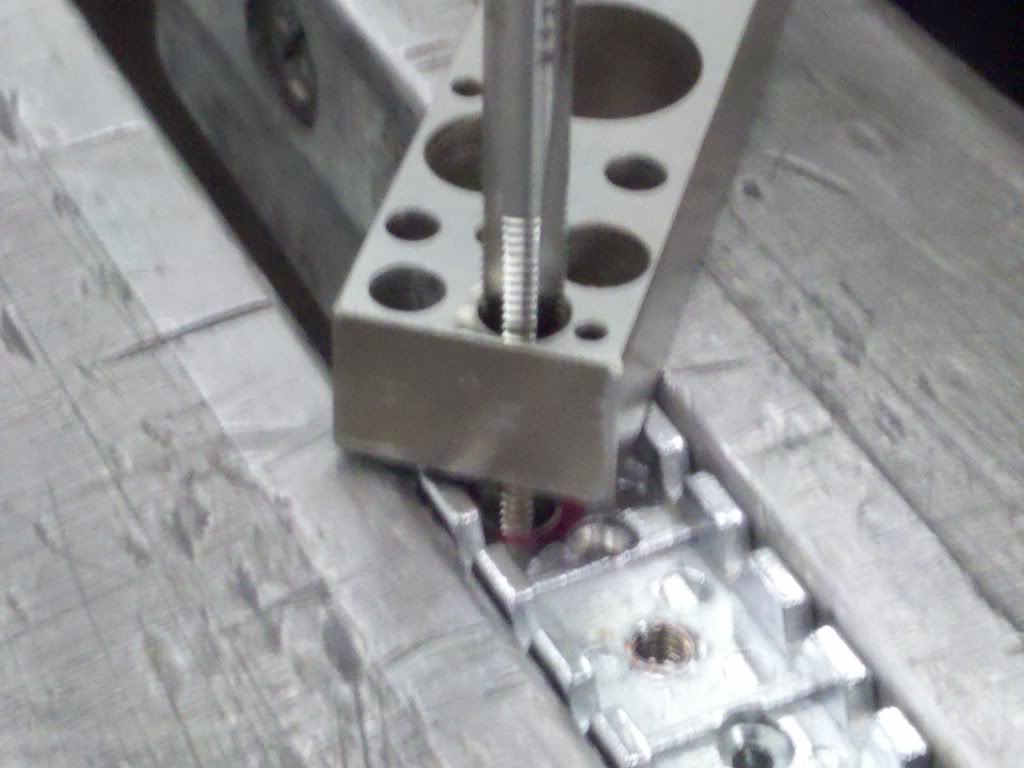
2a.) Using a drop or two of cutting fluid, or even 3-in-1 oil will aid in a clean thread cut and also keep the chips clear while turning
3.) Here is the helicoil itself and the insertion tool provided in the kit... (pardon the blurry pics as I only had my cell phone)

4.) Here is the helicoil wound onto the insertion tool ready for installation. You screw it into the oversized threaded hole just as if it were a screw itself...

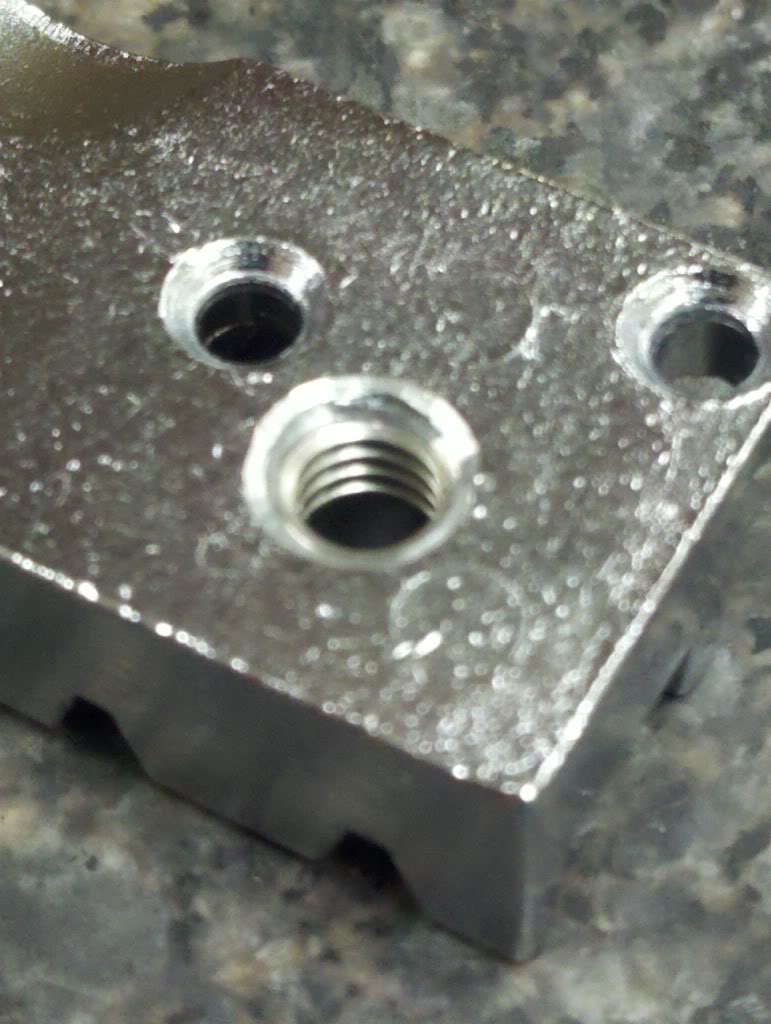
5.) Here is the repaired hole from the topside of the plate. You always work from the cavity side of the plate (top) towards the backside of the plate for all steps...

6.) Here is the repaired hole from the backside. Note the small end turned 90° toward the hole center. That is what the insertion tool "grabs" to turn into the oversized hole...

7.) A drive pin slightly smaller than the minor Ø of the repaired hole is used to punch the 90° end off. You may be able to see the precut break on the coil winding in the last pic...
8.) And finally (YEA !!!!!)...

9.) The kit itself can be ordered from any online tool supply house and also from many auto parts stores, some even carry them...

The repaired hole will be several factors better for holding strength and wear. The bolts used to capture your strings will now be grasping threads as hard as they are rather than the soft metal the plate is made from. The bolts will also help expand the helicoil in the fitment itself to improve the union and retard loosening.
Thanks for looking. Sorry if this got a bit wordy. Of course the kit comes with step by step instruction as well and its own alignment housing for the insertion tool. It is not difficult at all to do and you can always practice on the odd bit of scrap steel you have lying about before tackling the lock plate itself.
Since the plate is off the headstock now I will customize the 3 bolts by substituting gage pins of similar Ø to my strings and assemble the locks just as I would on the guitar. Then it is just a matter of starting with overlength screws and a sanding belt or offhand grinder to bring them under flush to the plate backside. And since I need 3, I will make 9.
Helicoils are a quick way to repair a stripped out threaded hole, and since they are hardened steel I also drilled out and inserted them in the other 2 tapped holes in my plate to prevent this from happening in the future. Unless you have a VERY, VERY steady hand with a hand drill the use of a drill press for the first step is really the way to go. So.....
1.) Drill out the damaged tapped hole ( marked in red here ). The drill press is very handy for this step...
2.) Re-tap the oversized hole with the provided oversized tap. I am doing this by hand using a homemade tap guide block to aid in keeping things plumb...
2a.) Using a drop or two of cutting fluid, or even 3-in-1 oil will aid in a clean thread cut and also keep the chips clear while turning
3.) Here is the helicoil itself and the insertion tool provided in the kit... (pardon the blurry pics as I only had my cell phone)
4.) Here is the helicoil wound onto the insertion tool ready for installation. You screw it into the oversized threaded hole just as if it were a screw itself...
5.) Here is the repaired hole from the topside of the plate. You always work from the cavity side of the plate (top) towards the backside of the plate for all steps...
6.) Here is the repaired hole from the backside. Note the small end turned 90° toward the hole center. That is what the insertion tool "grabs" to turn into the oversized hole...
7.) A drive pin slightly smaller than the minor Ø of the repaired hole is used to punch the 90° end off. You may be able to see the precut break on the coil winding in the last pic...
8.) And finally (YEA !!!!!)...
9.) The kit itself can be ordered from any online tool supply house and also from many auto parts stores, some even carry them...
The repaired hole will be several factors better for holding strength and wear. The bolts used to capture your strings will now be grasping threads as hard as they are rather than the soft metal the plate is made from. The bolts will also help expand the helicoil in the fitment itself to improve the union and retard loosening.
Thanks for looking. Sorry if this got a bit wordy. Of course the kit comes with step by step instruction as well and its own alignment housing for the insertion tool. It is not difficult at all to do and you can always practice on the odd bit of scrap steel you have lying about before tackling the lock plate itself.
Since the plate is off the headstock now I will customize the 3 bolts by substituting gage pins of similar Ø to my strings and assemble the locks just as I would on the guitar. Then it is just a matter of starting with overlength screws and a sanding belt or offhand grinder to bring them under flush to the plate backside. And since I need 3, I will make 9.

Iceman- Hero, Legend, and all round good guy
- Number of posts : 2894
Age : 61
Location : Up North
Registration date : 2011-02-22 -

Re: Repairing a Bendmaster locking nut with Helicoils
![]() by corsair Fri Apr 29, 2011 2:55 am
by corsair Fri Apr 29, 2011 2:55 am
That's just excellent, Ice - thank you very much!! You don't mention what size you drilled the original hole out to - 6mm? - and you also don't say whether a complete boob - your beloved mod - would be able to do it!! 
As to the substituting of strings by gauge pins to tee up the fixing bolts; do you ever change string gauges? I suppose, though, that the difference between, say, .46" and .52" is minimal for this application because your bolts will engage all of the threads pretty much anyway? I just made some bolts that were 2mm longer than the standard ones; your fix is an awful lot more elegant!!
Thanks again, buddy!!

corsair- Senior Member
- Number of posts : 6330
Age : 65
Location : Mount Hunter, NSW, Australia
Registration date : 2008-04-08
re: stringlock screw length
![]() by IanO Fri Apr 29, 2011 4:15 am
by IanO Fri Apr 29, 2011 4:15 am
If you'd all bought 80's/90's ibanez rg series guitars then you wouldn't have the thread problems............................just round allen key holes!!!!!!!!!!!!! Very annoying but an easier fix

IanO- Senior Member
- Number of posts : 259
Location : Cambridge U.K.
Registration date : 2011-02-04
Re: Repairing a Bendmaster locking nut with Helicoils
![]() by Iceman Fri Apr 29, 2011 6:37 am
by Iceman Fri Apr 29, 2011 6:37 am
@ Corsair: Yes John anyone, even those with extra thumbs, can do this. A drill press really is the only special equipment one would need (as well as a vise for holding the plate I suppose). As far as tap size for reconditioning, the kit itself has all the tools needed included in it and 3 lengths of coils to get you started. I used the shortest length for this project. The oversized tap in the kit is a unique size to the application, it is not any standard ANSI pitch one could order from MSC, Grainger or whomever a machinist should turn to on that side of the pond. Having a spare scrap of steel about to practice on first is the best advice I could give a timid do-it-yourselfer. As in anything, practice saves OEM parts.
@ IanO: The Ibanez forum is.....???... oh, that's right, I don't care where it is.
@ IanO: The Ibanez forum is.....???... oh, that's right, I don't care where it is.
Iceman- Hero, Legend, and all round good guy
- Number of posts : 2894
Age : 61
Location : Up North
Registration date : 2011-02-22 -
Re: Repairing a Bendmaster locking nut with Helicoils
![]() by Racing Fri Apr 29, 2011 6:58 am
by Racing Fri Apr 29, 2011 6:58 am
In sizes as small as the ones found on a locking nut Helicoil sometimes just wont cut it.
Seing that the loads involved are slim to say the least,from a metalurgic POW, i´ve done this another way on occasions.
I simply drill the hole out per your solution above. Measure the hole carefuly. Then install a set of nuts onto a bolt tightly and chuch it all into a lathe and turn the nuts outside circumferance down to appropriate pressfit size. Ie; 5/100mm or so oversize vs the hole.
A drop of full locking loctite and a brass drift coupled with some old fashioned violence makes short order of the install and works like a charm.
To be mentioned is that there is another system available under the helicoil solution known as "time-sert".
Time-sert is by the company Wurth(big vendor for various tool solutions)and the difference between Heli and Time is that Time is a complete winding. Solid in contrast to Helis kind of wound coil setup.
Time sert being the stronger solution by quite a margin.
Mark,at the shop of mine we carry a complete array of helis as well as timesert and in metric as well fractions.
Racing- Hero, Legend, and all round good guy
- Number of posts : 194
Age : 59
Registration date : 2009-02-27
Re: Repairing a Bendmaster locking nut with Helicoils
![]() by The Chad Fri Apr 29, 2011 12:15 pm
by The Chad Fri Apr 29, 2011 12:15 pm
Excellent tutorial Ice, good close up pics as well! 

The Chad- Financial supporter
- Number of posts : 2772
Location : Harrisburg, Pennsylvania
Registration date : 2011-02-01
Re: Repairing a Bendmaster locking nut with Helicoils
![]() by Iceman Fri Apr 29, 2011 1:20 pm
by Iceman Fri Apr 29, 2011 1:20 pm
It's good to see I am not the only machinist here.
Definitely LOTS of methods and approaches one could use to remedy what seems to be a common flaw in the function of this assembly. I was only providing the one that (to my thinking) would be the easiest for a player with limited mechanical skill or limited access to shop equipment to attempt.
Perhaps it's much different over on the continent and the islands than here in the states, but engine lathes are not all that accessible to most of those who are really players more than they are machinists. Also learning a running or interference fit on an OEM part would be dicey for an "all thumbs" type.
In my case make that a toolmaker who is trying to be a player. .
.
I tend to fall to the side of the aisle that looks for the least destructive fix to any problem as well. IanO's idea of simply adding blind holes to the headstock is by far even easier than what I've detailed here, but again too destructive for my tastes.
Definitely LOTS of methods and approaches one could use to remedy what seems to be a common flaw in the function of this assembly. I was only providing the one that (to my thinking) would be the easiest for a player with limited mechanical skill or limited access to shop equipment to attempt.
Perhaps it's much different over on the continent and the islands than here in the states, but engine lathes are not all that accessible to most of those who are really players more than they are machinists. Also learning a running or interference fit on an OEM part would be dicey for an "all thumbs" type.
In my case make that a toolmaker who is trying to be a player.
I tend to fall to the side of the aisle that looks for the least destructive fix to any problem as well. IanO's idea of simply adding blind holes to the headstock is by far even easier than what I've detailed here, but again too destructive for my tastes.
Iceman- Hero, Legend, and all round good guy
- Number of posts : 2894
Age : 61
Location : Up North
Registration date : 2011-02-22 -
Re: Repairing a Bendmaster locking nut with Helicoils
![]() by hoax Fri Apr 29, 2011 3:45 pm
by hoax Fri Apr 29, 2011 3:45 pm
That is a nice neat and professional quality repair, Iceman. Thanks for detailing this. Repairs and mods like this would be great in a library section of the new site.
Well done!!
Hoax
hoax- Financial supporter
- Number of posts : 1104
Age : 65
Location : Bothwell
Registration date : 2009-09-01
IanO- Senior Member
- Number of posts : 259
Location : Cambridge U.K.
Registration date : 2011-02-04
Re: Repairing a Bendmaster locking nut with Helicoils
![]() by Barry Fri Apr 29, 2011 4:37 pm
by Barry Fri Apr 29, 2011 4:37 pm
Exactly my thoughts Graham. Another entry for the future FixMe section for sure! This is just the kind of stuff many owners run into with these guitars. Thanks for taking the time to make a detailed post Steve.hoax wrote:
...Repairs and mods like this would be great in a library section of the new site...
_________________
"A little song. A little dance. A little seltzer down your pants." -Chuckles the Clown

GUITARS : https://legend.barryeames.com
MUSIC/PIX/VIDEOS: https://getback.barryeames.com (including Spectrum ST)

Barry- Hero, Legend, and all round good guy
- Number of posts : 8740
Age : 79
Location : Port Weller, St. Catharines, Canada
Registration date : 2009-05-01 -
Re: Repairing a Bendmaster locking nut with Helicoils
![]() by Iceman Fri Apr 29, 2011 6:04 pm
by Iceman Fri Apr 29, 2011 6:04 pm
[quote="corsair]
...As to the substituting of strings by gauge pins to tee up the fixing bolts; do you ever change string gauges? I suppose, though, that the difference between, say, .46" and .52" is minimal for this application... [/quote]
Sorry I missed this above John. The 4mm screws have a thread pitch of .7 mm which translates in strings to abit less than a standard D I believe. Put simply a complete turn would move the screw .028" so your assumption is correct as long as you are not swapping too large a difference.
While customizing the screw for my low E/A I found that turning it completely in without any strings and having about 1&1/2 threads exposed out the back surface will get very close. I use Dean Markley LTHB's so my low E is .052" and the A is .042" in diameter.
Iceman- Hero, Legend, and all round good guy
- Number of posts : 2894
Age : 61
Location : Up North
Registration date : 2011-02-22 -
Re: Repairing a Bendmaster locking nut with Helicoils
![]() by Iceman Mon May 02, 2011 6:05 pm
by Iceman Mon May 02, 2011 6:05 pm
So anyways... here is the rest of the story......
The aforementioned offneck method for customized length screws...

I used Deltronic gagepins rather than snipped string lengths here.
The very culprit himself tamed to a manageable length....
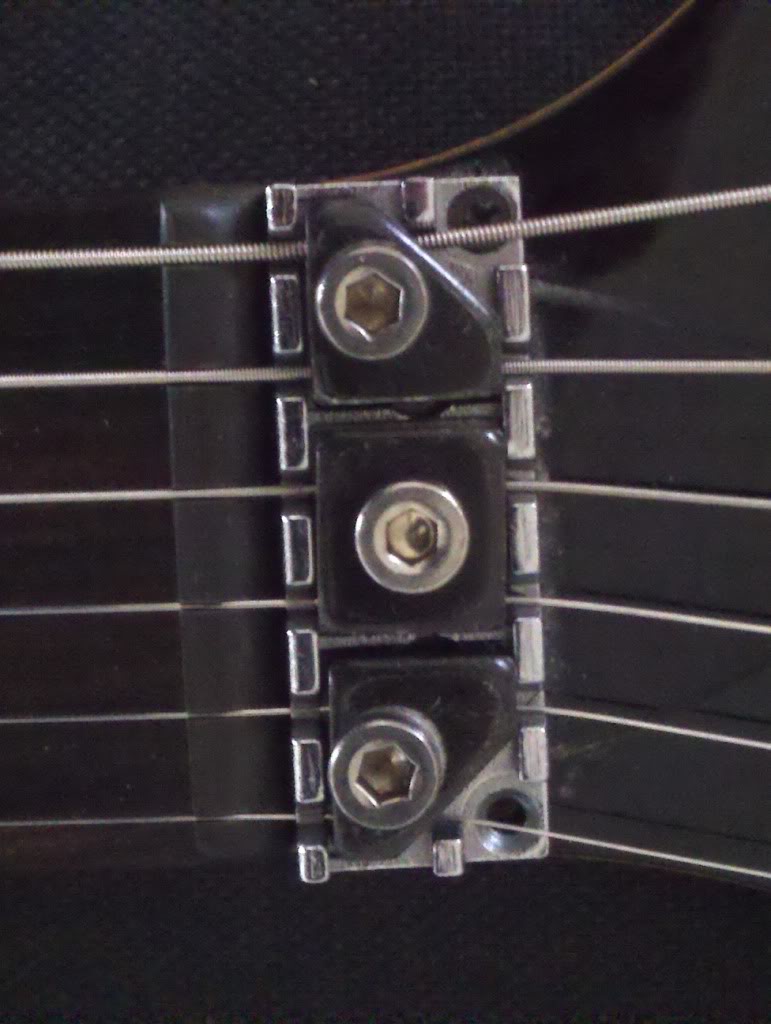
..and a sight most of you may be more familiar with.
Everything working again as it should. Just waiting now for a second plate promised by my seller and then the adventure of spooling up some replacements for the shims and clamps can begin.
The aforementioned offneck method for customized length screws...
I used Deltronic gagepins rather than snipped string lengths here.
The very culprit himself tamed to a manageable length....
..and a sight most of you may be more familiar with.
Everything working again as it should. Just waiting now for a second plate promised by my seller and then the adventure of spooling up some replacements for the shims and clamps can begin.
Iceman- Hero, Legend, and all round good guy
- Number of posts : 2894
Age : 61
Location : Up North
Registration date : 2011-02-22 -
Re: Repairing a Bendmaster locking nut with Helicoils
![]() by Westbone Mon May 02, 2011 6:36 pm
by Westbone Mon May 02, 2011 6:36 pm
Looks like a proper good fix. They dont need that much tightening, just nipped up not superman strength.

Westbone- Financial supporter
- Number of posts : 5918
Location : Redbridge
Registration date : 2008-12-28 -
Re: Repairing a Bendmaster locking nut with Helicoils
![]() by corsair Mon May 02, 2011 6:55 pm
by corsair Mon May 02, 2011 6:55 pm
Westbone wrote:Looks like a proper good fix. They dont need that much tightening, just nipped up not superman strength.
Yep; that there is the problem and the fix in one; nipped up, not cranked home!!
@Ice - good pix and tutorial, man!!
corsair- Senior Member
- Number of posts : 6330
Age : 65
Location : Mount Hunter, NSW, Australia
Registration date : 2008-04-08
» Bendmaster Locking Nut Stripped
» Repairing lock nuts !
» triaging/repairing electronics problems
» Repairing a Nut with Baking Soda and Super Glue
» Spectrum SX Locking Nut
» Repairing lock nuts !
» triaging/repairing electronics problems
» Repairing a Nut with Baking Soda and Super Glue
» Spectrum SX Locking Nut
Page 1 of 1
Permissions in this forum:
You cannot reply to topics in this forum|
|
|
